The first time I tried dahlia tuber planting, I made nearly every mistake possible. I put tubers in the ground too early, buried them too deep, and watered immediately after planting. By June, half had rotted without producing a single shoot. The following spring, I started fresh with better research and completely different results. By late summer, I had dahlias towering over four feet tall with dinner-plate blooms in every color imaginable. That turnaround taught me that dahlia tuber planting is incredibly rewarding—if you understand exactly what these plants need from day one.
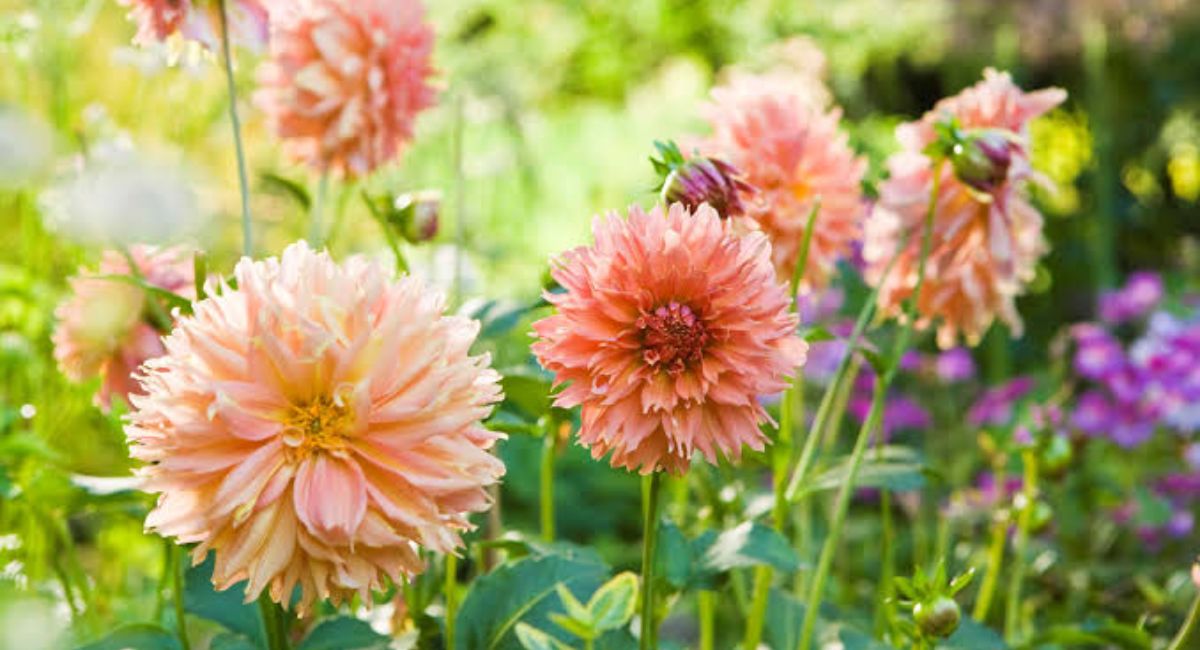
Few garden flowers can match the beauty and color of dahlias. From small pom-pom blooms to giant dinner-plate varieties, these stunning plants create a spectacular display throughout summer and fall. The secret to success begins underground with proper dahlia tuber planting. Healthy tubers and correct planting techniques lead to vigorous growth and months of brilliant flowers. In this guide, you’ll learn what dahlia tubers are, when and how to plant them, the best varieties to grow, common problems to avoid, and expert tips for achieving a vibrant, long-lasting dahlia garden that thrives season after season.
Master dahlia tuber planting with this complete guide—best timing, soil prep, depth, spacing, and expert tips to grow stunning dahlias every season.
Table of Contents
- What Is Dahlia Tuber Planting?
- Types and Varieties of Dahlias
- Benefits of Growing Dahlias from Tubers
- Common Problems, Diseases, and Pests
- Causes of These Problems
- How to Plant Dahlia Tubers Step by Step
- Prevention Tips for a Thriving Dahlia Garden
- Common Mistakes to Avoid
- Expert Tips
- Frequently Asked Questions
- Conclusion
- Key Takeaways
What Is Dahlia Tuber Planting?

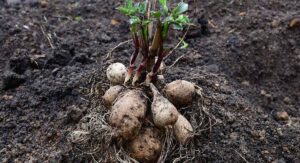
A dahlia tuber is the underground storage organ that fuels new growth each spring. It looks like a cluster of elongated, brownish sweet potatoes attached at a central crown, storing the starch and nutrients the plant needs to push shoots up through the soil.
Unlike bulbs (rounded and layered like onions), tubers are fleshy and irregular. Each tuber in a clump must have at least one “eye” — a small bud-like growth point near the crown — to produce a new plant. Without an eye, no amount of perfect soil will make it sprout.
Dahlia tuber planting refers to the full process of preparing, positioning, and placing these tubers in the ground or in containers so they develop into healthy, blooming plants. It always happens in spring, after your last frost date, because dahlias are tropical tender perennials that cannot survive frozen ground.
Dahlias are native to Mexico and Central America, evolving in rich volcanic soil at higher elevations. That background explains their needs: warm soil, good drainage, bright sun, and consistent moisture—but never soggy conditions.
When you understand what the tuber is trying to do — push shoots upward using stored energy — dahlia tuber planting becomes far more intuitive and far less intimidating.
Types and Varieties of Dahlias
One of the most exciting parts of growing dahlias is choosing from an enormous range of varieties. The American Dahlia Society recognizes over 20 flower forms and thousands of cultivars. Here are the main types:
By Flower Form:
- Dinner Plate Dahlias — Enormous blooms up to 12 inches across. Varieties like ‘Café au Lait’ and ‘Kelvin Floodlight’ are showstoppers.
- Ball Dahlias — Perfectly round, tightly formed flowers in small to medium sizes.
- Pompon Dahlias—Like ball dahlias but smaller (under 2 inches), neat as buttons.
- Cactus Dahlias — Rolled, spiky petals that look almost spidery and dramatic.
- Decorative Dahlias — The most common form: fully double flowers with flat, broad petals in a massive color range.
- Single Dahlias — One row of petals around an open center. Excellent for pollinators.
- Collarette Dahlias — Outer petals plus a shorter inner “collar” in a contrasting color.
- Waterlily Dahlias — Cupped, layered petals that mimic a water lily—delicate and romantic.
By Plant Height:
- Dwarf/Border Dahlias — Under 2 feet; great for containers and garden edges.
- Medium Dahlias — 2 to 4 feet; the most versatile size for home gardens.
- Giant Dahlias — 4 to 6+ feet; need staking but deliver unmatched drama.
For most beginners, starting dahlia tuber planting with a mix of decorative and dinner-plate varieties gives the most color reward per square foot.
Benefits of Growing Dahlias from Tubers
Why choose tubers over seeds or transplants? Here’s why experienced gardeners return to this method season after season:
- Faster blooms. Tubers contain stored energy seeds lack. A tuber typically blooms 8–10 weeks after dahlia tuber planting—seeds take far longer.
- True to variety. Tubers are genetically identical to the parent plant. You get exactly the flower form and color you selected.
- Economical in the long term. One tuber grows into a full clump by season’s end. Divide and replant year after year—one investment that compounds.
- Incredible variety selection. Specialty dahlia growers offer cultivars you’d never find as transplants at any local garden center.
- Outstanding cut flower production. Dahlias are among the most prized cut flowers, producing continuous blooms from midsummer through frost.
- Pollinator magnet. Single and semi-double dahlias attract bees and butterflies all season long.
- Long-lived plants. With proper dahlia tuber planting and storage, the same tubers can bloom for 10+ years.
Common Problems, Diseases, and Pests
Even with careful dahlia tuber planting, problems can arise. Here’s what to watch for:
Tuber Rot
Tubers sitting in wet, cold soil before roots develop are prime candidates for rot. Rotted tubers turn soft, mushy, and often develop a foul smell. This happens most when dahlia tuber planting is rushed into cold spring soil.
Powdery Mildew
A white, chalky coating on leaves — usually starting on lower foliage and spreading upward. It thrives in warm days combined with cool nights and poor air circulation around densely planted beds.
Botrytis Blight (Gray Mold)
Gray, fuzzy mold on flowers, buds, and stems spreads in cool, damp conditions. It’s especially problematic in wet summers and overcrowded plantings.
Dahlia Mosaic Virus
Mottled, distorted, or streaked foliage with slow growth and fewer blooms. There’s no cure—remove and destroy infected plants immediately to stop the spread.
Aphids
Clusters on new growth and buds, sucking sap and transmitting viral diseases as they move between plants. Heavy infestations distort new growth significantly.
Thrips
Tiny insects that rasp petal and leaf surfaces, leaving silvery streaking and distorted buds. Most problematic in hot, dry conditions.
Slugs and Snails
Newly emerging dahlia shoots are extremely vulnerable in spring. These pests can completely destroy young growth overnight.
Spider Mites
Thrive in hot, dry indoor and outdoor conditions. They cause stippling and fine webbing on leaves and spread rapidly without intervention.
Causes of These Common Problems
Most issues during the growing season trace back to one of these root causes:
- Planting too early — Cold, wet spring soil promotes rot before roots can form.
- Watering right after planting—moisture before root development is the fastest path to rot.
- Poor soil drainage — Heavy clay holds water too long around tubers and roots.
- Overcrowding plants—Restricts airflow and creates humid conditions fungal disease loves.
- Purchasing infected tubers — Viral diseases arrive on contaminated planting material.
- Leaving garden debris over winter — Old plant material harbors fungal spores and pest eggs.
- Inconsistent watering once established—Drought stress reduces blooms and invites pests.
- Not staking tall varieties—broken stems from wind create wounds where disease enters.
How to Plant Dahlia Tubers Step by Step
Follow this guide for successful dahlia tuber planting every time.
Step 1: Time It Right
Only begin dahlia tuber planting after your last frost date, once soil temperature has reached at least 60°F. Use a soil thermometer — this matters more than the air temperature. In most of the US, that’s late April through early June.
Step 2: Pick the Right Spot
Choose a location with full sun — at least 6 hours daily, ideally 8. Protection from strong wind prevents broken stems. Good drainage is non-negotiable.
Step 3: Prepare the Soil
Dig to 12 inches deep and add generous amounts of compost or aged manure. Dahlias prefer a slightly acidic to neutral pH of 6.5 to 7.0. Skip high-nitrogen fertilizers at this stage—they push foliage over flowers.
Step 4: Inspect Your Tubers
Before any dahlia tuber planting begins, check each tuber carefully. It should be firm, intact, and have at least one visible eye near the crown. Toss anything soft, hollow, or showing internal mold. Slightly shriveled but still firm tubers can be soaked in lukewarm water for one hour before planting.
Step 5: Plant at the Right Depth and Position
Place tubers horizontally with the eye facing up. Cover with just 2–3 inches of soil initially. Insert your stake now for tall varieties—doing it later risks damaging the tuber.
| Dahlia Type | Spacing |
| Dwarf/Border (under 2 ft) | 12–18 inches apart |
| Medium (2–4 ft) | 18–24 inches apart |
| Giant/Dinner Plate (4+ ft) | 24–36 inches apart |
Step 6: Do NOT Water Right Away
This is the most counterintuitive rule in dahlia tuber planting — and the most important one. Do not water after planting unless the soil is bone dry. The tuber has enough stored moisture to initiate root growth. Early watering before roots form is the primary cause of rot. Wait until green shoots appear above the soil, usually 2–4 weeks.
Step 7: Water and Feed Once Established
Once shoots are up, water deeply once or twice weekly — about 1–2 inches total. Feed every 2–4 weeks with a low-nitrogen, high-phosphorus formula (like 5-10-10) once plants reach 12 inches tall.
Step 8: Pinch for Maximum Blooms
When plants reach 12–16 inches with 3–4 sets of leaves, pinch out the central growing tip. This single step redirects energy into side branches, producing a bushier plant with dramatically more bloom sites.
Prevention Tips for a Thriving Dahlia Garden
- Confirm soil is at least 60°F with a thermometer before dahlia tuber planting
- Buy tubers from reputable specialty growers to minimize disease risk
- Inspect every tuber and discard any that are soft or suspect
- Amend soil with compost each season to maintain drainage and fertility
- Space plants generously for good airflow
- Insert stakes at planting time to avoid later root damage
- Mulch around plants after shoots emerge to conserve moisture
- Deadhead spent blooms regularly to encourage continuous flowering
- Inspect leaves weekly for early signs of pests or disease
- Clear all plant debris from the bed at the end of each season
Common Mistakes to Avoid
- Planting in cold soil. Soil below 60°F during dahlia tuber planting means rot is far more likely than sprouting.
- Watering tubers right after planting. The single most common beginner error. Wait for shoots before watering.
- Planting too deep. Cover with just 2–3 inches of soil. Deeper planting in heavy soil prevents shoots from surfacing.
- Skipping the pinch. This one step can double or triple your bloom count — don’t skip it.
- Over-fertilizing with nitrogen. Pushes leafy growth at the expense of flowers. Use a bloom-focused fertilizer.
- Growing in shade. Fewer than 6 hours of sun produces weak, floppy plants with poor flowering.
- Forgetting to lift tubers before frost. In zones 7 and below, tubers left in the ground will freeze and die.
- Not checking for eyes. A tuber without an eye will never grow—always verify before dahlia tuber planting.
Expert Tips
Start tubers indoors 4–6 weeks early. In short-season climates, pre-sprouting dahlia tubers in pots indoors before outdoor dahlia tuber planting gives you weeks of extra bloom time.
Divide clumps in spring, not fall. Eyes are far more visible in spring (often already sprouting), making it easier to ensure each division has a viable growing point.
Try the “sacrifice bloom” technique. For the largest dinner-plate blooms, remove all but one bud per stem to concentrate the plant’s energy into one spectacular flower.
Label everything. All stored tubers look identical by spring. Label at lifting time in fall, or you’ll have no idea what color or variety to expect.
Water in the morning. Morning watering lets foliage dry during the day. Evening watering leaves stems wet overnight—a direct invitation to fungal disease.
Feed potassium for stronger stems. A fertilizer with a higher third N-P-K number produces thicker stems that hold up heavy blooms without flopping.
FAQ’s
Q1: When is the best time for dahlia tuber planting?
After your last frost date when soil reaches at least 60°F—typically late April through late May in most of the US. Cold, wet soil is the leading cause of tuber rot and germination failure.
Q2: How deep should dahlia tubers be planted?
Place tubers horizontally with the eye facing up, covered by 2–3 inches of soil. Fill in the hole gradually as the shoot grows. Deeper planting in heavy soil can prevent shoots from reaching the surface.
Q3: Should I water after dahlia tuber planting?
No — and this is one of the most important rules you’ll follow. The tuber stores enough moisture to begin root development. Adding water before roots form dramatically increases rot risk. Wait until shoots emerge above the soil.
Q4: How long does it take dahlia tubers to sprout?
Generally 2–4 weeks, depending on soil temperature and variety. Warmer soil speeds germination considerably. Don’t give up on a slow tuber before the four-week mark.
Q5: Do dahlia tubers need soaking before planting?
Usually no. If tubers look slightly shriveled but are still firm after storage, a 1–2 hour soak in room-temperature water just before dahlia tuber planting can help rehydrate them. Don’t soak longer than a few hours.
Q6: Can I do dahlia tuber planting in containers?
Absolutely. Dwarf and medium varieties thrive in containers at least 12–15 inches in diameter. Use well-draining potting mix and water more frequently, since containers dry out faster than garden beds.
Q7: How do I store tubers over winter?
After frost blackens foliage, cut stems to 4–6 inches and dig up the clumps carefully. Let them dry for a few days, then store in barely-damp vermiculite or peat moss at 40–50°F in a dark, frost-free spot. Check periodically and discard any rotted pieces before the next round of dahlia tuber planting.
Q8: Why aren’t my tubers sprouting?
The most common causes are soil temperature below 60°F, no viable eye on the tuber, overwatering after dahlia tuber planting, or rot from storage damage. Verify soil temp, check for eyes, and hold off on watering until you see shoots.
Q9: How far apart should tubers be spaced?
Dwarf varieties: 12–18 inches. Medium: 18–24 inches. Giant dinner-plate varieties: 24–36 inches. Good spacing during dahlia tuber planting keeps airflow healthy and reduces disease pressure all season.
Conclusion
There’s a reason passionate gardeners become almost obsessed with dahlias. Once you experience waves of color from midsummer through frost, it’s hard to imagine a garden without them. It all comes down to getting dahlia tuber planting right. The core rules aren’t complicated: warm soil, correct depth, no water until shoots appear, full sun, and good drainage. Those fundamentals, done consistently, are what separate a spectacular dahlia bed from a disappointing one.
The most common failures — rotted tubers, no sprouting, sparse blooming — almost always trace back to cold planting conditions, too much early water, or too little sunlight. Get those three things right and your results will improve dramatically. Dahlia tuber planting also rewards you more every year. As you learn which varieties suit your climate, refine your soil prep, and master dividing and storing tubers, the whole process becomes second nature, and the blooms get better.
Grab your soil thermometer, pick varieties that excite you, and commit to proper dahlia tuber planting timing. Your late-summer self, surrounded by enormous colorful blooms, will be very glad you did.
Key Takeaways
- Time it right. Only start dahlia tuber planting once soil hits 60°F and frost risk is gone.
- No water after planting. The most important rule is to skip early watering to prevent rot.
- Eye facing up, 2–3 inches deep. The correct position and depth every time you plant a dahlia tuber.
- Full sun required. Six to eight hours of direct sun daily is non-negotiable for good blooms.
- Good drainage prevents most problems. Amend heavy soil and avoid water-pooling spots.
- Stake at planting time to avoid damaging roots once the plant is growing.
- Pinch at 12–16 inches to encourage branching and multiply bloom sites dramatically.
- Watch for aphids, thrips, slugs, and spider mites—weekly inspections catch problems early.
- Prevent fungal disease with proper spacing, morning watering, and prompt removal of infected foliage.
- Lift before hard frost in zones 7 and below, and store correctly for successful dahlia tuber planting the following spring.