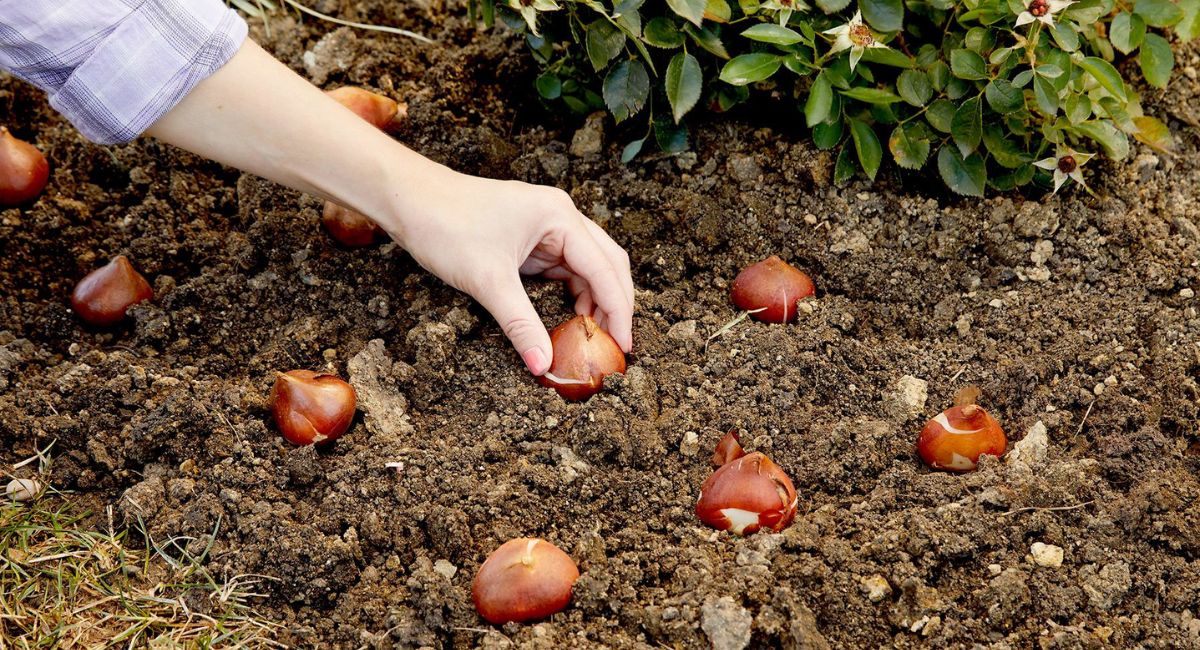
The first time I tried to figure out how to plant tulip bulbs, I did everything wrong in the most avoidable ways possible. I planted them in October — which was actually fine — but I put them in a patch of heavy clay that had terrible drainage, didn’t bother checking which end was up on half of them, and buried them at a depth that felt roughly right rather than one I’d actually measured. Come spring, about a third of them came up. Another third produced leaves but no flowers.
Once I actually learned how to plant tulip bulbs properly — the right soil, the right depth, the right timing relative to soil temperature — the results were dramatically different. Nearly every bulb flowered. The colors were vivid, the stems were strong, and the display lasted weeks longer than my early botched attempts had ever managed. It’s one of those gardening skills where the gap between doing it carelessly and doing it correctly is enormous, but the correct version isn’t actually complicated once you understand why each step matters.
Learning how to plant tulip bulbs correctly is the biggest factor between a disappointing patch and a stunning spring display.
How to Plant Tulip Bulbs Understanding Timing and Soil Temperature:
Timing is probably the most misunderstood aspect of how to plant tulip bulbs — most people know “autumn” but don’t understand what the actual trigger is, which leads to planting too early, missing the window entirely, or putting bulbs in the ground when conditions are actively hostile to their survival through winter. The key isn’t the calendar date — it’s soil temperature. Tulip bulbs need to go into soil that has cooled to below 55°F (13°C) at the planting depth.
Above that temperature, the bulbs don’t enter the dormancy period they need to prepare for spring flowering, and they become disproportionately vulnerable to the fungal pathogens — particularly Botrytis tulipae (tulip fire) and Fusarium bulb rot — that devastate warm, moisture-laden bulbs sitting in soil that hasn’t properly cooled for the season. In most temperate climates this means planting between late September and November, but if you’re in a warmer zone or experience a prolonged warm autumn, wait for the soil to actually cool rather than planting by the calendar and hoping for the best.
The other side of the timing equation when figuring out how to plant tulip bulbs is not leaving it too late. Bulbs planted after the ground hardens with early frost don’t establish the root system they need before winter — roots develop in cold but not frozen soil, and that root development is what anchors the bulb and allows it to draw moisture and nutrients through the cold months before the shoot emerges in spring.
Aim for a window where you have at least six weeks of cold but workable soil ahead before the ground freezes solid. In practice this means monitoring soil temperature with a cheap thermometer at six-inch depth through September and October, and planting as soon as the reading drops below 55°F and stays there consistently for several days in a row rather than dipping down overnight and bouncing back up through the warmth of an extended autumn season.
How to Plant Tulip Bulbs Complete Step-by-Step Reference Table:
Keep this reference table handy when you’re actually in the garden — it covers every key decision in the how to plant tulip bulbs process with the specific numbers that make a real difference to outcomes.
| Step / Factor | Correct Specification | Common Mistake | Consequence of Error |
| Planting depth | 6–8 inches (15–20 cm) | Too shallow (2–3 inches) | Frost heave, no flowering |
| Bulb orientation | Pointed tip facing upward | Planted sideways or inverted | Weak, contorted emergence |
| Spacing | 4–6 inches between bulbs | Overcrowding | Fungal spread, reduced flowers |
| Soil type | Well-draining loam or sandy soil | Heavy clay, poor drainage | Bulb rot, Fusarium infection |
| Soil pH | 6.0–7.0 slightly acidic | Too alkaline or too acidic | Nutrient deficiency, yellow leaves |
| Timing | Soil below 55°F (13°C) | Planting too early in warm soil | Botrytis fungal infection |
| Watering at planting | One thorough soak after planting | No water or repeated watering | Dry failure or root rot onset |
| Fertilizer | Bone meal or bulb fertilizer at base | High-nitrogen feed applied | Lush leaves, no blooms |
| Mulching | 2–3 inch layer after planting | No mulch in cold climates | Frost heave damage to bulbs |
| Bulb quality check | Firm, unblemished, no mold | Planting soft or spotted bulbs | Disease spread to healthy bulbs |
How to Plant Tulip Bulbs in the Right Soil and Drainage Conditions:
Soil preparation is the step that has the biggest impact on long-term success when learning how to plant tulip bulbs, and it’s the one most people skip because it’s less satisfying than the actual planting. Tulips are native to the mountainous regions of Central Asia — places with thin, rocky, extremely well-drained soils and cold, dry winters. The single most important soil characteristic for successful tulip culture is drainage. A tulip bulb sitting in waterlogged soil through winter is a bulb on its way to rotting, full stop.
The pathogenic microorganisms responsible for bulb rot — primarily Fusarium oxysporum, Pythium species, and the oomycete Phytophthora — colonize bulb tissue in oxygen-depleted, saturated soil conditions. They work slowly enough that the bulb might still sprout in spring before collapsing, or fast enough that the bulb simply doesn’t emerge at all. Either way, the outcome traces back to a drainage problem that was present from the day of planting.
1. Testing soil drainage:
Before you start thinking about how to plant tulip bulbs in a specific spot, test the drainage. Dig a hole about a foot deep, fill it with water, and time how long it takes to drain completely. If water is still sitting there an hour later, the drainage is inadequate for tulips. Either choose a different location, raise the bed by six to eight inches with imported well-draining soil, or incorporate coarse grit at a ratio of roughly one part grit to three parts existing soil through the planting zone to improve drainage through the critical root and bulb layer.
2. Amending clay soils:
Clay soil is the enemy of tulip bulbs — it holds water, compacts around the bulb, warms and cools slowly, and creates exactly the anaerobic conditions that Fusarium and Pythium species exploit. If you’re committed to a clay-soil location for your how to plant tulip bulbs project, substantial amendment is non-negotiable. Work in large volumes of coarse horticultural grit, composted pine bark, or perlite through the top twelve inches of soil. The goal is a soil that clumps when squeezed but crumbles apart immediately when released — not a soil that forms a solid ball that holds its shape and retains water for hours after being handled.
3. Raised bed advantages:
Raised beds are genuinely the easiest way to guarantee the drainage conditions that tulip bulbs need, and if you’re asking how to plant tulip bulbs and your garden soil is heavy or poorly drained, building a raised bed is often the most practical long-term solution. Fill with a custom blend of sixty percent topsoil, thirty percent coarse grit, and ten percent composted organic matter. The elevated position ensures passive drainage regardless of what the native soil beneath is doing, and the loose, well-aerated growing medium actively discourages the soil-borne fungal and bacterial pathogens that destroy bulbs in denser, wetter growing conditions throughout the winter months.
How to Plant Tulip Bulbs at the Correct Depth Every Single Time:
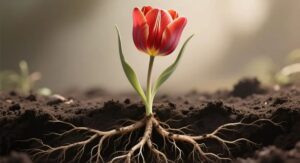
Planting depth is one of the non-negotiable specifics in how to plant tulip bulbs successfully. Too shallow and the bulbs are exposed to frost heave — the repeated freeze-thaw cycle that physically pushes shallowly planted bulbs up and out of the ground, leaving them exposed and damaged. Too deep and the shoot has too far to travel to reach the surface, exhausting the bulb’s energy reserves before it emerges and often producing weak, etiolated growth that lacks the structural integrity to support the flower.
The standard recommendation of six to eight inches is based on practical experience across many climate zones and represents the depth at which the bulb stays consistently cold enough to complete its vernalization requirement while remaining protected from surface frost damage throughout the harshest winter conditions.
1. Depth measurement method:
The most practical way to consistently achieve correct depth when figuring out how to plant tulip bulbs across a large planting is a purpose-made bulb planter — a cylindrical tool that removes a core of soil to a precise depth, drops the bulb in, and replaces the soil core on top. Mark your target depth on a trowel handle with tape if you’re using a standard trowel. Measure the first hole, check it, and use that as your calibrated reference for the rest of the planting session to keep depth consistent across the whole bed rather than eyeballing each hole and ending up with half your bulbs at the wrong level.
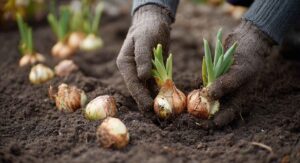
2. Pointed end up:
Orient every bulb with the pointed tip facing upward when working out how to plant tulip bulbs — the pointed end is where the shoot emerges and it needs to face the surface. Most bulbs make this obvious, but some rounder varieties can be genuinely ambiguous. When in doubt, look for the flattened basal plate at the bottom of the bulb — that’s where the roots emerge, and it goes down. Bulbs planted sideways or inverted will usually correct themselves given enough time, but they expend considerable stored energy doing it, which weakens the plant and can reduce flowering quality in that first spring season significantly.
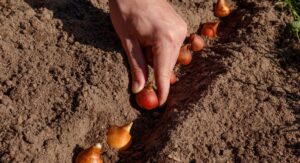
3. Spacing for health:
Correct spacing when learning how to plant tulip bulbs matters beyond just the visual impact. Bulbs planted too close together — less than four inches apart — create the dense canopy conditions above ground and the compressed root competition below that invite fungal diseases to spread between plants. Botrytis tulipae, the pathogen responsible for tulip fire disease, spreads rapidly through overcrowded plantings where infected tissue from one plant contacts healthy tissue on the next. Four to six inches between bulbs allows air circulation above ground and adequate root space below, reducing both disease pressure and competition for the soil moisture and nutrients that healthy development requires throughout the spring growing period.
How to Plant Tulip Bulbs and Prevent Disease from the Start:
Disease prevention starts before the bulb goes in the ground — it starts with the bulbs you buy and the condition they arrive in. Understanding the most common diseases that affect tulips gives you the diagnostic tools to spot problems early and the prevention strategies to avoid them in the first place, which is far more effective than trying to treat established infections in bulbs you’ve already planted and are waiting on through an entire winter.
- Always inspect each bulb before planting — discard any showing soft spots, mold, or dark discoloration on the outer scales immediately.
- Botrytis tulipae causes the twisted, distorted, spotted growth called tulip fire — it spreads through overcrowded plantings very rapidly.
- Fusarium bulb rot produces pink or brown mold at the base of the bulb and causes complete failure to emerge in spring without warning.
- Dust bulbs with sulfur powder or a bulb-specific fungicide before planting if your soil has a history of previous tulip disease problems.
- Never replant tulips in the same spot for at least three years — rotating prevents the buildup of soil-borne pathogens between planting seasons consistently.
How to Plant Tulip Bulbs for Maximum Spring Color and Impact:
Once you’ve mastered the technical requirements, the creative side of how to plant tulip bulbs becomes genuinely enjoyable — choosing varieties, planning color combinations, layering bloom times to extend the display, and thinking about the plant combinations that will set the tulips off once they emerge. These decisions make the difference between a tulip display that looks like someone scattered bulbs randomly and one that creates the kind of layered, color-coordinated impact that actually delivers on the promise of those catalog photographs that convinced you to plant tulips in the first place.
- Layer early, mid, and late tulip varieties in the same bed to extend the overall display window by four to six weeks.
- Plant tulip bulbs in groups of ten or more of the same variety rather than mixing single bulbs of multiple types together.
- Combine with alliums planted at the same time — they fill the gap after tulips finish and extend color through late spring naturally.
- Mark planted areas clearly to prevent accidentally digging into the bulbs when planting summer annuals in the same beds later.
- Plant Darwin hybrid varieties for the most reliable repeat flowering in subsequent seasons without lifting and chilling bulbs annually.
How to Plant Tulip Bulbs in Containers and Pots Successfully:
Container growing opens up how to plant tulip bulbs to gardeners who don’t have borders — balcony growers, patio gardeners, and anyone with a garden where the soil is too poor or too wet to support bulbs in the ground. Containers actually give you advantages: complete control over soil drainage, the ability to move pots to where they look best when blooming, and easy cold treatment for gardeners in mild climates who need to artificially chill their bulbs before planting to trigger the vernalization process tulips require for flowering.
1. Container soil mix:
The soil mix matters enormously for containers when planning how to plant tulip bulbs in pots — use a fifty-fifty blend of quality potting compost and horticultural grit to guarantee the fast drainage that prevents the root rot and Fusarium bulb infections that develop in containers where moisture sits around the bulbs for extended periods. Never use garden soil in containers — it compacts, loses drainage rapidly, and harbors the soil-borne microorganism populations that colonize bulbs when confined root environments stay wet through cold months without the natural drainage that open ground provides through gravity and soil structure.
2. Winter container care:
Containers are more vulnerable to frost than in-ground planting when working out how to plant tulip bulbs in pots — the root zone of a pot can freeze solid in a way that in-ground planting resists because of the thermal mass of surrounding soil. In climates with hard winters, move containers against a sheltered wall, wrap them in hessian or bubble wrap, or lift them into an unheated shed where they stay cold but don’t freeze solid.
The bulbs need cold to complete vernalization — they don’t need to be frozen into a solid block of ice that damages root tissue and the basal plate from which both roots and shoots emerge as temperatures warm back up.
3. Layered bulb planting:
Container growing enables the “lasagne” method of how to plant tulip bulbs — planting different varieties in layers at different depths within the same pot to create a succession of blooms from a single container. Largest, latest-blooming bulbs go deepest at eight inches; medium varieties at five or six inches above them; small early-blooming species tulips just below the surface at three inches. Each layer blooms in sequence, extending the container display across several weeks and producing a much more complex and interesting show than a single-variety pot planted at a uniform depth would ever achieve.
How to Plant Tulip Bulbs and Care for Them After Flowering:
Understanding how to plant tulip bulbs doesn’t end when the flowers open — what you do after flowering determines whether those bulbs produce good displays in subsequent seasons or decline and eventually stop flowering altogether. Post-bloom care is the step that separates gardeners who get one good season from those who get consistent, improving displays over multiple years from the same bulbs without the expense and effort of replanting the entire bed from scratch every single autumn.
1. Deadheading correctly:
Remove spent tulip flowers as soon as petals begin dropping, but leave the full stem and all foliage intact. The leaves are photosynthesizing actively after bloom, manufacturing and storing the carbohydrates that refuel the bulb for next year’s flowering. Removing leaves before they yellow and die back naturally — the classic mistake of tidying up too eagerly — starves the bulb of the energy it needs to build next season’s flower bud inside the bulb tissue over the summer months. Wait until foliage has yellowed completely and pull away from the bulb with minimal resistance before removing any green material from the bed.
2. Lifting and storing:
In heavy or wet soils, lifting tulip bulbs after the foliage has died back completely and storing them in a cool, dry, well-ventilated location over summer dramatically improves repeat performance year after year. Clean lifted bulbs of loose skin and soil, inspect each one carefully for signs of Fusarium basal rot — a pink or brown discoloration at the flat bottom of the bulb — and discard any showing these symptoms rather than storing them alongside healthy bulbs where the fungal pathogen spreads invisibly through stored populations until replanting season reveals the extent of the damage in the following spring’s flowering failure.
3. Naturalizing in grass:
Species tulips and certain botanical varieties naturalize well in grass, where they return reliably year after year without lifting, with minimal disease pressure because the free-draining conditions and dry summer dormancy period mimics their native Central Asian habitat closely. Plant at the same depth of six to eight inches, scatter bulbs randomly for a natural effect, and delay the first mowing of naturalized areas until all tulip foliage has died back completely — typically six weeks after flowering finishes. This approach requires almost no ongoing intervention once established and produces one of the most authentic-looking spring wildflower effects achievable in a home garden.
Conclusion
Mastering how to plant tulip bulbs properly is one of the most satisfying skills in seasonal gardening. Get the drainage right, plant at the correct depth and time, inspect every bulb before it goes in the ground, space generously to prevent fungal disease spread, and care for the foliage properly after flowering. Do those things consistently and tulips reward you with a spring display that improves year on year — the kind of reliable, vibrant, color-saturated garden moment that makes every autumn planting session completely worth the effort.
FAQ’s
Q1. When is the best time to learn how to plant tulip bulbs?
The best time to practice how to plant tulip bulbs is when soil temperature drops below 55°F — typically late September through November in most climates.
Q2. How deep should I go when planting tulip bulbs?
When following how to plant tulip bulbs guidelines, plant six to eight inches deep — this protects against frost heave and ensures proper spring emergence reliably.
Q3. What causes tulip bulbs to rot in the ground after planting?
Bulb rot after how to plant tulip bulbs is almost always caused by poor drainage creating the anaerobic conditions that Fusarium and Pythium pathogens need to thrive.
Q4. Which end faces up when planting tulip bulbs correctly?
The pointed tip faces upward — a fundamental step in how to plant tulip bulbs that ensures the shoot emerges toward the surface without wasting stored energy.
Q5. Can I learn how to plant tulip bulbs successfully in containers?
Yes — how to plant tulip bulbs in containers works beautifully with a fifty-fifty grit and compost blend ensuring the fast drainage that prevents bulb rot.
Q6. How far apart should tulip bulbs be spaced when planting?
Space four to six inches apart — crowding increases fungal disease pressure, and correct spacing is a key step in how to plant tulip bulbs for health.
Q7. Should I water tulip bulbs after planting them in autumn?
Give one thorough soak immediately after how to plant tulip bulbs to initiate root development — then let natural rainfall handle moisture through the winter months.
Q8. How do I prevent tulip fire disease when planting bulbs?
Correct spacing, inspecting bulbs before planting, and rotating locations annually are the main prevention steps in how to plant tulip bulbs without fungal disease problems.
Q9. Do tulip bulbs come back every year after planting once?
Many do — Darwin hybrid varieties are the most reliable for repeat flowering after following how to plant tulip bulbs correctly with proper post-bloom foliage care.
Summary
Learning how to plant tulip bulbs correctly transforms one of the most potentially rewarding spring gardening projects from a frustrating gamble into a reliably spectacular seasonal display. Soil drainage is the foundation — without it, even perfectly timed, correctly oriented bulbs succumb to the Fusarium, Pythium, and Botrytis fungal pathogens that destroy bulbs in waterlogged conditions.
Planting depth, timing relative to soil temperature, bulb inspection and spacing, and post-bloom foliage all compound each other to determine whether your how to plant tulip bulbs investment produces the kind of spring color that makes the whole garden look its best for weeks on end. Getting these fundamentals right and how to plant tulip bulbs becomes one of those skills you genuinely look forward to practicing every autumn — knowing with real confidence that the display waiting for you next April will be worth every bulb you planted in the cold autumn soil.