I had zero gardening experience when I decided to fill my backyard with something beautiful and low maintenance so I started researching how to plant lavender after falling in love with the smell at a farmers market. I picked a sunny spot with really well drained soil because I had read that lavender hates sitting in wet ground and that one decision made all the difference. Watching it actually bloom that first summer felt like a genuine personal victory.
Learning how to plant lavender properly is one of the most rewarding journeys a gardener can take. This remarkable perennial hails from the sun-scorched hillsides of the Mediterranean, where thin, rocky, fast-draining soil and relentless sunshine shape it into one of the toughest and most fragrant plants on earth. When you replicate those conditions even partially in your own garden, lavender repays you with decade after decade of color, fragrance, and ecological richness.
Learn how to plant lavender the right way and enjoy beautiful blooms, amazing fragrance, and a thriving garden every season.
How to Plant Lavender in Well-Draining Soil Correctly
The single most important lesson when learning how to plant lavender is understanding what the plant demands from its soil. Lavender is not forgiving of heavy, water-retentive ground. In its native Mediterranean environment, it grows in soils that are lean, slightly alkaline, gritty, and drain almost instantly after rainfall. When you try to grow it in the opposite conditions — rich, damp, clay-heavy soil — you are essentially asking a desert-adapted plant to survive underwater, and it simply cannot do that for long.
The most destructive consequence of waterlogged soil is root rot, a disease complex driven primarily by fungal microorganisms including species of Phytophthora and Pythium. These pathogens thrive in oxygen-depleted, saturated conditions and attack the root system from below, turning firm white roots into brown, mushy, decomposing tissue. By the time you notice symptoms above ground — a wilting plant, yellowing leaves, stems that collapse at the base — the root system may already be severely compromised. Prevention is vastly easier than treatment, and prevention begins entirely with soil preparation before you ever put a plant in the ground.
To correctly understand how to plant lavender in the right growing medium, begin by digging your planting site to a depth of around 30 to 45 centimetres. Work in generous quantities of horticultural grit, sharp sand, or perlite — aim for a ratio of roughly one part grit to three parts existing soil. If your native soil is heavy clay, consider raising the bed by at least 15 to 20 centimetres using a combination of topsoil and grit. This elevated root zone drains freely and stays aerated even after heavy rain, creating exactly the inhospitable environment that root rot microorganisms hate.
Soil pH matters considerably when thinking about how to plant lavender with long-term success in mind. Lavender prefers a slightly alkaline pH between 6.5 and 7.5. Acidic soils promote nutrient deficiencies — particularly iron and magnesium shortages — that manifest as yellow leaves, a condition called chlorosis where leaf tissue fades while veins remain green.
If your soil tests below 6.5, incorporate garden lime into the planting area several weeks before planting to adjust the balance. Avoid heavy doses of nitrogen-rich compost. Overfed lavender produces lush, soft, nitrogen-saturated growth that is weak, prone to flopping, and highly attractive to bacterial infections and fungal diseases that exploit the compromised cell walls of over-fertilised plants.
How to Plant Lavender: Variety Comparison and Care Chart
Before committing to a planting plan, selecting the correct variety for your specific climate and conditions is absolutely essential to long-term success. Different lavender species and cultivars carry very different tolerances for cold, humidity, drought, and disease pressure. Choosing a variety poorly matched to your environment is one of the most common reasons gardeners struggle even when they do everything else correctly.
| Lavender Variety | Hardiness Zone | Key Trait | Disease Risk |
| Lavandula angustifolia ‘Hidcote’ | Zone 5–8 | Deep purple, compact | Low — excellent all-round resistance |
| Lavandula angustifolia ‘Munstead’ | Zone 5–8 | Early bloomer, shorter | Low — hardy against fungal leaf spot |
| Lavandula x intermedia ‘Grosso’ | Zone 5–8 | High oil yield, tall | Medium — root rot risk in clay soils |
| Lavandula x intermedia ‘Provence’ | Zone 5–9 | Large blooms, fragrant | Medium — Botrytis in humid climates |
| Lavandula stoechas ‘Ballerina’ | Zone 7–10 | Butterfly bracts, showy | High — sensitive to wet winter soil |
| Lavandula dentata | Zone 8–11 | Serrated leaves, long bloom | Medium — bacterial crown rot possible |
| Lavandula ‘Phenomenal’ | Zone 4–9 | Cold and heat tolerant | Very Low — specifically bred for resistance |
| Lavandula ‘Vera’ | Zone 5–8 | Classic cottage variety | Low — sturdy across most conditions |
| Lavandula multifida | Zone 8–10 | Finely cut exotic foliage | Medium — some virus susceptibility noted |
| Lavandula ‘Avonview’ | Zone 7–10 | Vigorous, heat-tolerant | Low — good generalised resistance |
For gardeners in cooler, wetter climates, ‘Phenomenal’ and ‘Hidcote’ consistently outperform other varieties because both carry strong natural resistance to the fungal infections and root rot diseases that wet winters promote. Gardeners in warmer, drier climates have a wider selection to choose from, though they should remain vigilant about Botrytis grey mould during any unusually humid periods regardless of variety.
How to Plant Lavender Step by Step With Proven Techniques
Successfully executing how to plant lavender in your garden requires following a clear, logical sequence of preparation, planting, and immediate aftercare steps that respect this plant’s natural origins and its genuine need for specific growing conditions. Rushing any stage creates problems that compound over time.
Choosing Your Site
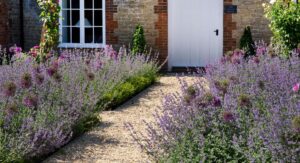
The best site for planting lavender offers uninterrupted full sunlight for a minimum of six hours every single day, with shelter from persistent cold, damp winds that drive fungal spore pressure. South-facing or southwest-facing borders are excellent choices in temperate climates because they capture the most solar energy across the growing season, keep the soil warm and dry, and allow air to circulate freely around each plant.
Elevated or gently sloped ground is ideal because it promotes natural surface drainage, ensuring rainwater moves away from root zones rather than pooling. Avoid low-lying spots, areas near downpipes or drainage outlets, and any location where the soil stays visibly damp for extended periods after rainfall. These conditions actively cultivate the fungal microorganism populations that cause the most destructive lavender diseases.
Preparing the Ground
Ground preparation is where the vast majority of gardeners get how to plant lavender fundamentally wrong, and it is the stage that determines long-term success or failure more than any other. Dig the entire planting area thoroughly, breaking up any compacted layers below the topsoil that might impede drainage.
Remove every piece of weed root you encounter, because decaying organic matter in the soil feeds bacteria and fungi directly, increasing disease pressure around new plantings significantly. Work coarse horticultural grit or perlite through the soil uniformly, and if the native soil is particularly heavy, do not hesitate to import a topsoil-grit blend to create an entirely fresh growing medium. Apply a light dressing of garden lime if a soil test confirms pH is below 6.5, and allow several weeks for the amendment to integrate before planting.
Spacing Your Plants
Correct plant spacing is one of the most frequently underestimated aspects of how to plant lavender successfully, yet it plays a critical role in long-term plant health and disease prevention. Compact varieties like ‘Hidcote’ and ‘Munstead’ should be positioned 30 to 45 centimetres apart. Larger lavandin hybrids like ‘Grosso’ and ‘Provence’ need 60 to 90 centimetres between plants to achieve their full potential.
Adequate spacing promotes airflow between and around individual plants, which is genuinely critical for disease management. Dense, overcrowded plantings trap moisture between foliage and create the warm, humid microclimate that Botrytis grey mould, fungal leaf spots, and other airborne fungal diseases depend upon to establish and spread rapidly from plant to plant.
How to Plant Lavender and Diagnose Yellow Leaves Quickly
Yellow leaves are one of the most alarming and commonly misunderstood symptoms that gardeners encounter after learning how to plant lavender for the first time. They can signal several very different problems, and correctly identifying the underlying cause is essential because each cause requires a different response. Treating the wrong problem wastes time and allows the actual issue to worsen unchecked while the plant continues to decline.
Overwatering Signs
Overwatering is by far the most frequent cause of yellow leaves in lavender, and it is deeply ironic that it is also the mistake most commonly made by conscientious gardeners who simply want their plants to thrive. When soil remains constantly moist, the root zone becomes oxygen-depleted and anaerobic bacterial microorganisms rapidly colonise it. Roots lose their ability to absorb nutrients and water efficiently, and the plant starves despite being surrounded by moisture.
The visible response is yellowing of the lower leaves first, progressing upward through the plant as the root system deteriorates. If you squeeze a stem at soil level and it feels soft or collapses easily, overwatering combined with root rot is almost certainly the cause. Immediately improving drainage and allowing the soil to dry completely between watering events is the first corrective action to take.
Nutrient Deficiency
In acidic soils or heavily rainfall-leached growing conditions, yellow leaves following how to plant lavender can indicate a nutrient deficiency rather than overwatering. Iron and magnesium deficiencies both cause a condition called chlorosis, where leaf tissue yellows while the veins remain distinctly green.
This pattern of yellowing is quite different from the uniform, soft yellowing caused by overwatering or root rot. Chlorosis in lavender is most often a pH-related problem rather than a genuine shortage of nutrients in the soil — when pH drops below 6.5, iron and magnesium become chemically locked and unavailable to roots even when present in adequate quantities. Raising soil pH with garden lime is usually sufficient to resolve chlorosis without adding additional fertilisers, which can complicate plant health further.
Fungal Infection Symptoms
Several fungal infections produce yellow leaf symptoms in lavender plantings, and distinguishing between fungal causes and the issues above is important for effective management. Botrytis cinerea, commonly called grey mould, is one of the most prevalent fungal pathogens affecting lavender in cool, damp climates.
It creates water-soaked brown patches on leaves and stems, surrounded by a ring of yellow tissue, and produces a characteristic grey fuzzy spore mass in humid conditions. Fusarium crown rot attacks at soil level, producing brown discolouration of the stem base that progresses upward while yellowing spreads through the foliage above. Both diseases spread rapidly when plants are overcrowded or poorly ventilated, reinforcing why correct spacing is a disease prevention strategy as much as it is an aesthetic one.
How to Plant Lavender While Protecting Against Root Rot

Root rot prevention deserves its own dedicated section in any comprehensive guide covering how to plant lavender, because this disease complex is responsible for more lavender deaths than any other single cause in garden settings worldwide. The frustrating reality is that root rot is almost entirely preventable through correct soil preparation and sensible watering practices, yet it continues to claim plants from even experienced growers who become complacent about drainage management.
Improving Soil Structure
The most reliable approach to preventing root rot when planning how to plant lavender is investing serious time and effort into improving soil structure before a single plant goes into the ground. Raised beds are extraordinarily effective — elevating the root zone 20 to 30 centimetres above surrounding ground level ensures free drainage even during prolonged wet periods.
Container-grown lavender benefits from a mix of specialist gritty compost and perlite at a 3:1 ratio, combined with excellent drainage holes and the practice of raising pots on feet to allow free water escape. Applying a generous layer of gravel mulch directly around each plant’s crown at ground level provides two important benefits: it prevents rainwater from pooling and splashing at the most infection-vulnerable point of the plant, and it reflects heat back up into the plant during cool periods, keeping stems warm and dry.
Identifying Root Rot
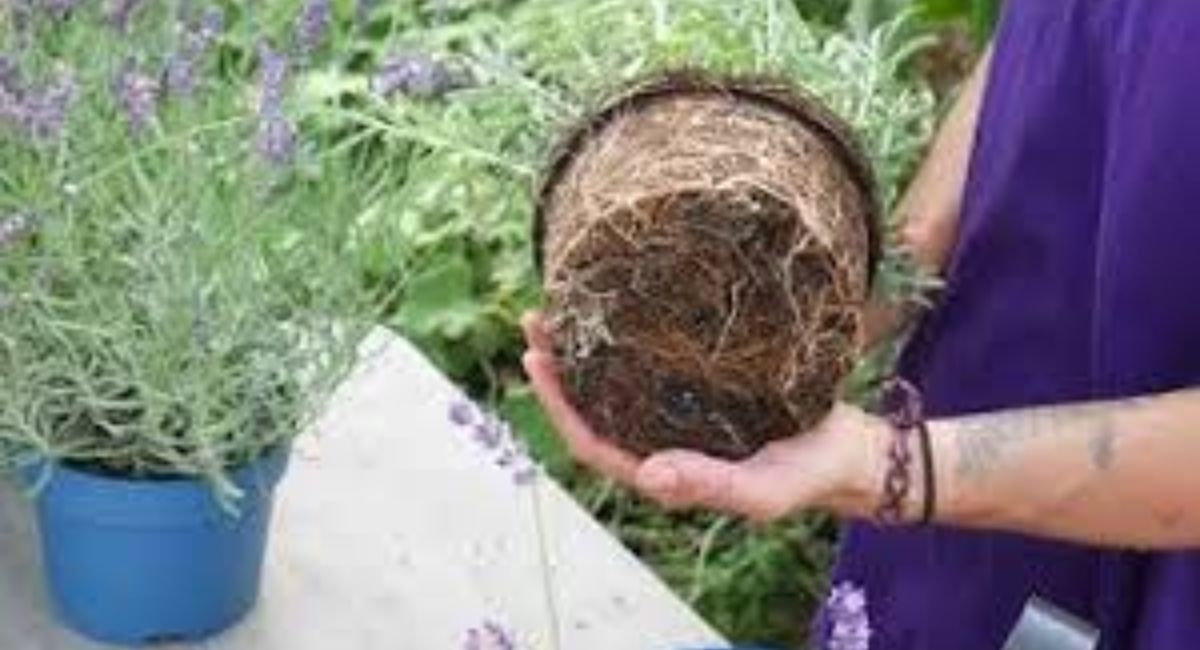
Knowing how to plant lavender well includes knowing how to diagnose root rot accurately before it reaches a terminal stage, because early identification dramatically improves the chances of saving a plant. The most reliable diagnostic method is gently lifting a wilting plant and examining its root system directly. Healthy lavender roots are white or pale cream in colour, feel firm under finger pressure, and show no off odour.
Roots infected by Phytophthora or Pythium species — the primary microorganisms responsible for root rot — turn progressively brown then black, collapse to a mushy consistency when compressed, and emit a distinctly unpleasant, slightly sour smell. Above-ground symptoms that suggest root rot is developing below include persistent wilting that does not respond to watering, sudden leaf yellowing across multiple stems simultaneously, and a soft or dark discolouration of the stem at the point where it meets the soil surface.
Treatment and Recovery
Early-stage root rot can sometimes be successfully treated when caught quickly, giving you a realistic chance of saving a plant while you continue refining your approach to how to plant lavender correctly. Remove the plant from the ground, shake off all soil from the root ball, and carefully cut away every blackened, mushy, or discoloured root using sharp, sterilised scissors. Dust all cut root surfaces generously with powdered sulphur or a copper-based fungicide product to prevent reinfection of exposed tissue.
Allow the plant to air dry for a few hours before replanting into completely fresh, gritty, well-draining compost. Biological controls containing beneficial Trichoderma fungi are a worthwhile addition to the new growing medium — these microscopic organisms colonise the root zone and actively suppress pathogenic microorganisms through direct competition, enzyme production, and physical barrier formation.
How to Plant Lavender With Perfect Watering Habits Always
Watering is the area where the largest number of beginners learning how to plant lavender make their most consequential and recurring mistakes. The fundamental misunderstanding is treating lavender like a moisture-loving garden plant that needs regular watering to look its best, when the opposite is true. Lavender is a drought-adapted, xeric plant that performs best under conditions of deliberate under-watering rather than attentive over-watering. Follow these five rules consistently and your plants will never suffer from moisture-related disease again.
- Water newly planted lavender deeply once every five to seven days during the first establishment season only.
- Once established after the first full growing season, lavender survives on natural rainfall without any supplemental irrigation in most climates.
- Always direct water at the base of the plant and never overhead, because wet foliage dramatically increases the risk of fungal leaf diseases spreading across the plant.
- Water in the morning rather than the evening so that any moisture reaching the foliage dries off completely before temperatures drop at night and humidity rises.
- Apply a gravel mulch around each crown at planting time to prevent soil splash reaching the plant during watering and rainfall, reducing bacterial and fungal microorganism transmission from soil to stems.
How to Plant Lavender and Prevent Common Pest Problems
Pests very rarely cause serious damage to well-grown lavender, and understanding how to plant lavender with the right growing conditions in place naturally minimises pest pressure significantly. Healthy, properly sited lavender growing in lean, fast-draining soil with excellent airflow is genuinely unattractive to most insect pest populations because stressed, soft, over-fertilised growth is far more palatable and accessible to feeding insects than the tough, aromatic growth that good cultivation produces. However, there are several specific pests worth monitoring regularly.
- Cuckoo spit produced by froghopper nymphs causes shoot wilting — remove by blasting firmly with a directed water jet.
- Rosemary beetles and their larvae skeletonise individual leaves — handpick carefully during cool morning hours when beetles are sluggish and slow.
- Aphid colonies on new shoot tips spread viral infections between plants — control populations with neem oil spray before colonies become established and damaging.
- Root aphids colonise soil level undetected for extended periods — drench affected soil thoroughly with diluted insecticidal soap solution to eliminate hidden infestations.
- Whitefly on greenhouse or conservatory lavender spreads rapidly in warm conditions — deploy yellow sticky traps above plant level to capture adult populations before they become established.
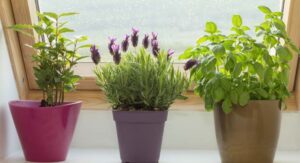
How to Plant Lavender in Containers for Year-Round Beauty
Understanding how to plant lavender in containers opens genuinely exciting possibilities for gardeners with limited ground space, including those managing patios, balconies, courtyards, and doorstep plantings. Container cultivation allows you to place lavender exactly where it looks and performs best, move it to protected positions during particularly harsh winter periods, and create striking visual arrangements that fixed ground planting cannot achieve. The key principles are largely the same as in-ground cultivation, but container plants demand slightly more attention to a few specific factors.
Choose terracotta pots rather than plastic or glazed ceramic containers whenever possible. Terracotta is naturally porous, allowing excess moisture to evaporate through the pot wall rather than accumulating in the compost, which significantly reduces root rot risk. Every container must have multiple large drainage holes in the base — never plant into a pot without them, regardless of how attractive it looks. Fill with a specialist lavender or Mediterranean compost blend mixed with at least 30 percent perlite or horticultural grit for additional drainage capacity.
Container-grown lavender requires more proactive monitoring and management for root rot compared to in-ground plantings because roots are confined and cannot escape waterlogged zones by growing deeper or sideways. Check pots regularly during wet weather, and if they feel excessively heavy, allow them to dry completely before watering again. Repot into fresh compost every two to three years as compost degrades and compacts over time, reducing drainage and aeration and creating the conditions that fungal microorganisms exploit. Always raise containers on pot feet or small pebble layers to allow free drainage from base holes without restriction.
How to Plant Lavender and Prune for Maximum Annual Blooms
Annual pruning is not an optional extra in lavender cultivation — it is a fundamental maintenance requirement, and understanding how to plant lavender with a long-term pruning strategy in mind from the beginning will completely change the quality and longevity of your plants. Lavender that goes unpruned for several seasons becomes increasingly woody, develops a bare, leafless centre, loses vigour, produces fewer and shorter flower spikes, and becomes progressively more vulnerable to wind damage, disease entry through cracked bark, and the general decline that characterises neglected specimens.
The optimal timing for pruning is immediately after the main flowering period concludes in late summer or early autumn, while the plant still has enough growing season remaining to produce fresh green growth before winter. Cut the entire plant back by approximately one-third of its total height, shaping it into a consistent, rounded mound form. Use sharp, clean pruning shears that you wipe with isopropyl alcohol between plants to avoid transmitting any fungal or bacterial infections on the blades.
Never cut back to completely bare, grey, woody stems. Lavender cannot regenerate from old wood — it lacks the adventitious buds that allow plants like buddleja or roses to regrow from leafless wood after hard pruning. Always retain visible green foliage on every stem you keep, even if that means leaving more than you would like.
A light secondary trim in early spring, just as new growth begins to emerge from the crown, removes any winter-damaged or frost-blackened shoot tips and encourages a dense, bushy base structure that supports strong seasonal flowering. This spring tidy-up is also an excellent opportunity to inspect each plant carefully for early signs of fungal infection, root rot, or bacterial damage at the crown, allowing you to address any problems before warmer temperatures accelerate disease spread through the planting.
Conclusion
Mastering how to plant lavender genuinely rewards every gardener who invests the time to understand what this extraordinary plant needs. The fundamentals are consistent and clear: choose the right variety for your climate, prepare well-draining soil with care and patience, space plants generously for airflow, water conservatively and intelligently, prune annually with confidence, and remain vigilant against the fungal diseases, root rot, yellow leaf problems, and bacterial infections that poorly managed growing conditions invite. Apply these principles from the beginning and your lavender will deliver fragrance, colour, and beauty for ten years or more.
Frequently Asked Questions About How to Plant Lavender
1. When is the best time to learn how to plant lavender outdoors successfully?
Spring, after all frost risk has passed, is ideal when you how to plant lavender for the strongest possible root establishment before winter arrives.
2. How deep should I dig when I how to plant lavender in the garden?
Dig a hole at least twice the depth and width of the root ball when you how to plant lavender to encourage healthy, vigorous root development.
3. Can I successfully how to plant lavender in partial shade conditions?
No — understanding how to plant lavender means accepting that it requires a minimum of six hours of direct daily sunlight without compromise.
4. What soil pH is optimal when I how to plant lavender in my border?
A slightly alkaline pH range of 6.5 to 7.5 is ideal when you how to plant lavender for nutrient availability and disease resistance.
5. Why do leaves turn yellow after I how to plant lavender in new soil?
Yellow leaves after you how to plant lavender typically signal overwatering, root rot, or incorrect soil pH requiring prompt investigation and correction.
6. How frequently should I water after I how to plant lavender during establishment?
Water once every five to seven days after you how to plant lavender until the plant is fully established and self-sufficient through rainfall.
7. Does gravel mulching help when I how to plant lavender in heavy clay soil?
Yes — gravel mulch around the crown when you how to plant lavender in clay prevents moisture pooling and dramatically reduces fungal infection risk.
8. What fertiliser is appropriate after I how to plant lavender in fresh compost?
Avoid all heavy fertilising once you how to plant lavender — lean, nutrient-poor soil consistently produces healthier and more aromatic plants than well-fed ones.
9. Can I successfully how to plant lavender from cuttings rather than buying plants?
Yes — softwood cuttings taken in summer are faster and more reliable when you how to plant lavender and want true-to-type plants quickly.
Summary
Understanding how to plant lavender begins with choosing a well-draining, sunny site and selecting a disease-resistant variety matched to your specific climate. Every successful approach to how to plant lavender involves thorough soil preparation using grit or perlite, correct plant spacing for airflow, conservative and strategic watering, and consistent annual pruning that prevents woody decline.
Practicing how to plant lavender with this disciplined approach prevents the fungal diseases, root rot, bacterial infections, and yellow leaf problems that claim poorly managed plants season after season. Any gardener who truly commits to learning how to plant lavender with patience and precision discovers a generous, resilient, and spectacularly rewarding plant that earns its permanent place in every garden it inhabits.