
The first rubber plant I owned was a gift — a glossy, deep-burgundy beauty I placed in the darkest corner of my living room. Within weeks, its lower leaves turned yellow and dropped. I had overwatered it, provided almost no light, and used the wrong potting mix. At the time, I had no idea these mistakes were causing the problem because nobody had explained what practical rubber plant care actually looks like in a real home.
That early failure sent me down a years-long journey of researching, experimenting, and mastering rubber plant care. I learned everything from proper light requirements and watering habits to diagnosing yellow leaves, root rot, fungal infections, and pest problems that many care guides barely mention. Today I grow several thriving rubber plants and want to share what I’ve learned so your experience is successful from the start instead of becoming a frustrating trial-and-error process.
Master rubber plant care completely — protect every leaf, prevent disease, and grow the most stunning indoor plant in your home ever.
Rubber Plant Care Fundamentals Every New Owner Must Know:
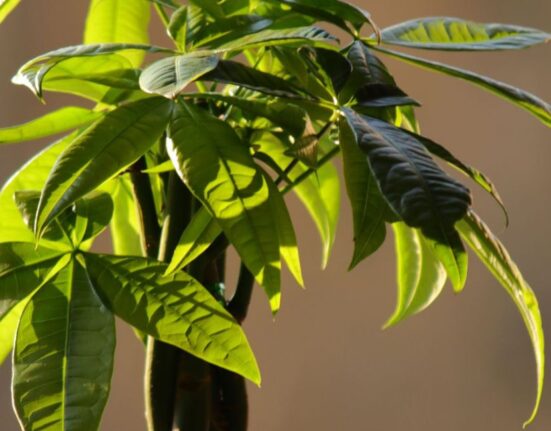
Successful rubber plant care begins with understanding the botanical identity and natural habitat of Ficus elastica — a species native to the tropical rainforests of Southeast Asia, particularly the regions of India, Nepal, Bhutan, Burma, China, Malaysia, and Indonesia, where it grows as a large canopy tree reaching heights of thirty meters or more in its wild form.
In our homes and offices, the rubber plant is kept as a compact, manageable specimen through container cultivation and occasional pruning, but its fundamental biological needs — warm temperatures, bright indirect light, consistently moist but never waterlogged soil, and moderate to high ambient humidity — reflect its origins in a lush, humid, consistently warm tropical forest environment where rainfall is abundant and soils drain freely between wet periods. Understanding these origins is not merely academic trivia; it is the practical foundation on which every decision you make about light placement, watering schedule, soil mix selection, and seasonal care adjustments should be grounded if you want to achieve genuinely impressive, long-term results with this plant in a domestic setting.
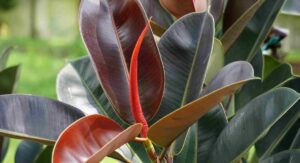
The rubber plant is celebrated among houseplant enthusiasts for its striking ornamental foliage, which comes in several visually distinctive cultivar forms. The classic Ficus elastica ‘Robusta’ produces large, glossy, deep forest-green leaves with a prominent central midrib, while the popular ‘Burgundy’ cultivar features dramatically dark, almost-black leaves that develop rich reddish undertones in bright light conditions. The variegated ‘Tineke’ and ‘Ruby’ cultivars produce stunning cream, green, and pink-streaked leaves that are highly sought after by collectors.
Regardless of cultivar, the fundamental principles of Rubber Plant Watering Tips remain largely consistent — bright indirect light, careful watering, appropriate nutrition, and vigilant monitoring for the common diseases and pest problems that affect this species across all varieties. Building your care routine on these universal principles, then adjusting for the specific needs of your cultivar and home environment, is the most reliable path to sustained long-term success.
Rubber Plant Care Light and Temperature Requirements Guide:
Of all the environmental factors that determine the success or failure of your rubber plant care routine, light and temperature are arguably the most immediately impactful and the most commonly mismanaged by new plant owners who underestimate just how much bright light this tropical species genuinely needs to thrive. The table below provides a comprehensive ten-parameter reference covering every key environmental and care variable you should track and maintain across the full growing season and into the winter rest period of your rubber plant’s annual lifecycle in a domestic indoor environment.
| Care Parameter | Ideal Condition | Warning Signs | Status |
| Light Level | Bright indirect, 4–6 hrs daily | Leggy stems, pale or dropping leaves | Essential |
| Watering Frequency | Every 7–10 days; top 3cm dry first | Yellow leaves, root rot, wilting | Critical |
| Temperature Range | 18°C – 30°C (65°F – 86°F) | Leaf drop, browning, slow growth | Essential |
| Soil pH | 6.0 – 7.0 slightly acidic | Nutrient lockout, yellow leaves | Important |
| Humidity Level | 40–60% relative humidity | Crispy leaf edges, fungal spots | Moderate |
| Fertilizer Schedule | Monthly, balanced NPK spring–autumn | Pale leaves, stunted new growth | Seasonal |
| Pot Drainage | Multiple holes, perlite-amended mix | Soggy soil, root rot odor | Critical |
| Repotting Cycle | Every 2 years or when root-bound | Roots from drainage holes, stagnation | Periodic |
| Leaf Cleaning | Monthly wipe with damp cloth | Dust-blocked pores, pest harboring | Recommended |
| Pruning Frequency | Spring pruning for shape and health | Overcrowded, disease-prone canopy | Annual |
Rubber Plant Care Common Diseases and Fungal Infections:
Disease management is one of the most critically important and yet most frequently neglected aspects of thorough rubber plant care in domestic environments. Fungal, bacterial, and viral pathogens can take hold rapidly under suboptimal growing conditions — particularly in situations involving excessive soil moisture, poor air circulation around the plant canopy, or physical damage to stems and leaves that creates open entry points for opportunistic microorganisms seeking a hospitable host tissue environment.
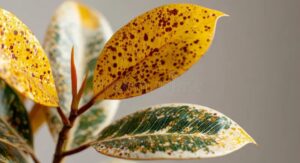
1. Leaf Spot Fungal:
Fungal leaf spot diseases, most commonly caused by Cercospora and Corynespora species, represent one of the most visually alarming disease problems encountered in Rubber Plant Watering Tips These fungal pathogens produce small, circular, water-soaked lesions on leaf surfaces that gradually enlarge and develop tan, brown, or dark centers surrounded by distinctive yellow halos. Infection spreads rapidly through splashing water droplets carrying fungal spores from one leaf to another, especially during overhead watering. Treatment involves removing all infected leaves immediately, improving air circulation around the canopy, and applying a copper-based fungicide spray every seven days until new spotting ceases completely.
2. Root Rot Disease:
Root rot caused by water-mold microorganisms — principally Phytophthora and Pythium species — is the single most common and most destructive disease problem in rubber plant care, typically developing as a direct consequence of chronic overwatering combined with poorly draining potting media. The disease progresses silently underground, destroying root tissue before visible above-ground symptoms appear, which typically include sudden wilting despite moist soil, dark stem discoloration at the base, and progressive yellow leaf drop starting from lower nodes. Treatment requires unpotting, trimming all blackened roots, treating with hydrogen peroxide solution, and repotting into fresh, fast-draining substrate with generous perlite amendment added.
3. Powdery Mildew:
Powdery mildew, caused primarily by Oidium species in indoor environments, appears as white or grey powdery coating on the upper surfaces of leaves on a neglected Rubber Plant Watering Tips specimen — most commonly in conditions of warm temperatures combined with low air movement and moderate to high humidity around dense leaf canopies. The fungal coating progressively causes affected leaves to yellow, distort, and drop prematurely as the pathogen depletes nutrients from epidermal cells through haustorial feeding structures. Control involves isolating the affected plant immediately, significantly improving ventilation, removing heavily coated leaves, and applying either neem oil solution at five milliliters per liter or potassium bicarbonate spray every five days until infection clears completely from all remaining leaf surfaces.
Rubber Plant Care Yellow Leaves Causes and Proven Solutions:
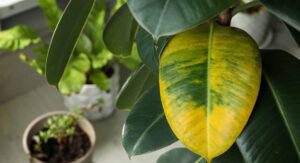
Yellow leaves represent the single most frequently reported concern among those practicing rubber plant care at home, yet the underlying cause can originate from a surprisingly diverse range of sources — from simple nutritional imbalances and watering errors to active fungal infections, bacterial cankers, viral diseases, and environmental stressors that each require a completely different diagnostic and treatment approach to resolve successfully.
1. Overwatering Stress:
Overwatering is statistically the leading cause of yellow leaves encountered in home rubber plant care, creating anaerobic, oxygen-depleted soil conditions that suffocate root cells, disrupt normal nutrient absorption, and invite pathogenic water-mold microorganisms to colonize weakened root tissue. The yellowing typically progresses from older lower leaves upward through the plant, accompanied by soft or mushy stem tissue at the base and a distinctively sour odor rising from the saturated potting mix. Resolution requires immediately reducing watering frequency to allow soil to dry between sessions, verifying container drainage is fully functional, and amending the potting mix with perlite if compaction is contributing to water retention beyond the plant’s uptake capacity.
2. Nutrient Deficiency:
Nutrient deficiencies — particularly nitrogen, magnesium, and iron — produce characteristic yellow leaf patterns in Rubber Plant Watering Tips that differ meaningfully in their appearance and progression from disease-related discoloration, helping growers distinguish between nutritional and pathological causes. Nitrogen deficiency causes uniform yellowing of older lower leaves progressing upward, while magnesium deficiency produces interveinal chlorosis where leaf tissue between the veins turns yellow while the veins themselves remain green, and iron deficiency causes yellowing of new young growth at the growing tips first. Each deficiency is corrected through targeted supplementation — balanced liquid fertilizer for nitrogen, Epsom salt foliar spray for magnesium, and chelated iron solution drenched into the root zone for iron chlorosis correction in affected specimens.
3. Bacterial Leaf Blight:
Bacterial leaf blight caused by Xanthomonas campestris produces angular, water-soaked yellow lesions on leaves that are distinctively bounded by the leaf’s natural vascular network, giving them their characteristic geometric rather than circular shape — a visual clue that distinguishes bacterial from fungal leaf diseases in Rubber Plant Watering Tips diagnosis.
The infection spreads through water splash, contaminated pruning tools, and physical contact between leaves, and progresses rapidly under warm, humid conditions with poor air circulation. There is no curative chemical treatment for established bacterial blight; affected leaves must be removed and destroyed immediately, all pruning tools sterilized with seventy percent isopropyl alcohol between cuts, and overhead watering replaced with base irrigation to eliminate water splash as a transmission pathway going forward.
Rubber Plant Care Watering Techniques to Prevent Root Rot:
Mastering the art of precise, disciplined watering is the single highest-leverage skill improvement available to anyone serious about improving their rubber plant care routine, because both overwatering and underwatering produce damaging consequences that compound over time — root rot and fungal disease from excess moisture on one end, drought stress, leaf drop, and reduced pest resistance from prolonged dryness on the other.
The correct approach lies in establishing a soil-moisture-responsive watering practice rather than a fixed-interval calendar schedule, because the rate at which a rubber plant’s potting medium dries varies significantly based on pot size, ambient temperature, seasonal light levels, pot material, and the plant’s own metabolic activity during active growth versus winter dormancy.
Before each watering event, insert your index finger two to three centimeters into the potting mix — if the soil at that depth feels clearly dry and pulls away from your fingertip without leaving moisture traces, the plant is ready to be watered thoroughly. If any perceptible moisture remains, wait two to three more days before checking again rather than watering on a predetermined schedule that ignores the plant’s actual moisture status at that moment.
When watering is indicated, apply water slowly and evenly across the entire soil surface until it begins flowing freely through the drainage holes at the base of the container, confirming that the entire root zone has been adequately moistened throughout its depth rather than just the surface layer. After thorough watering, allow the pot to drain completely for fifteen to twenty minutes before returning it to its saucer or decorative outer pot, and always empty any standing water that collects in the saucer within thirty minutes to prevent the soil from reabsorbing that excess moisture back upward through capillary action — a process that maintains soil saturation and creates exactly the anaerobic conditions in which root rot microorganisms thrive.
During winter when the rubber plant naturally reduces its growth rate and metabolic activity, extend watering intervals by thirty to fifty percent relative to your summer schedule, and always err toward slightly underwatering during cold months when the risk of fungal and root rot pathogens causing damage to dormant root tissue is at its highest annual level in indoor rubber plant care practice.
Rubber Plant Care Pest Problems and Organic Control Methods:
- Rubber Plant Watering Tips requires weekly neem oil spray to prevent spider mite infestations on leaves.
- Scale insects attack Rubber Plant Watering Tips specimens by latching onto stems and draining vital sap.
- Mealybugs hide in leaf axils of Rubber Plant Watering Tips plants — remove them with rubbing alcohol swabs.
- Fungus gnats signal overwatered Rubber Plant Watering Tips soil; allow the substrate to dry between waterings.
- Thrips damage Rubber Plant Watering Tips foliage by rasping leaf surfaces — use yellow sticky traps nearby.
Rubber Plant Care Fertilization Schedule for Lush Growth:
- Feed Rubber Plant Watering Tips specimens monthly with balanced liquid fertilizer during spring and summer.
- High-nitrogen fertilizer in spring supports the Rubber Plant Watering Tips growth flush and new leaf production.
- Avoid fertilizing Rubber Plant Watering Tips specimens during winter when the plant enters natural dormancy.
- Dilute fertilizer to half strength for Rubber Plant Watering Tips plants in low-light indoor positions always.
- Monthly compost tea application improves Rubber Plant Watering Tips soil biology and long-term root health.
Rubber Plant Care Propagation Techniques for New Plants:
Propagating new plants from an established specimen is one of the most rewarding and cost-effective aspects of dedicated rubber plant care, allowing you to multiply your collection, share plants with friends, or replace an aging parent plant with a vigorous young specimen grown from cuttings that carry the exact genetic characteristics of your favourite cultivar. The two most reliable propagation methods for home growers are stem cuttings in water or moist propagation medium, and air layering — a more advanced technique that encourages root formation on a living branch before it is separated from the parent plant, dramatically improving the success rate of propagation for thicker, more mature stems that may be difficult to root through conventional cutting methods.
Stem cutting propagation begins with selecting a healthy shoot tip of fifteen to twenty centimetres in length that includes at least two to three leaf nodes and one actively growing leaf at the tip, using sterilized sharp scissors or a blade to make a clean cut just below a node at a slight angle to maximise the surface area available for root initiation. The cut end will immediately release a milky white latex sap that is characteristic of the Ficus genus — this sap can cause skin and eye irritation, so wearing gloves and washing hands thoroughly after handling any cut stem is a non-negotiable safety precaution in proper Rubber Plant Watering Tips propagation practice.
Allow the cut end to callus for thirty minutes in open air before placing it in clean water or moist perlite to begin rooting, keeping it in a warm, bright indirect light location with high ambient humidity by covering with a clear plastic bag or propagation dome to minimize moisture loss from the cutting before roots develop.
Air layering is particularly well-suited to rubber plant care propagation when you want to create a new plant from a larger, more mature section of the parent stem that already carries several developed leaves — a situation where conventional stem cutting propagation is less reliable due to the greater moisture demands of multiple large leaves on a rootless cutting. The technique involves selecting a healthy, upward-growing branch section and making two shallow parallel cuts through the outer bark approximately four centimetres apart at the desired rooting point, then removing the ring of bark between the cuts to expose the pale inner cambium layer beneath.
This exposed ring of cambium tissue is dusted generously with rooting hormone powder and then wrapped tightly with a golf-ball-sized handful of moist sphagnum moss, which is then sealed completely with a layer of clear plastic film tied at both ends to maintain consistently high moisture levels around the exposed tissue throughout the rooting period.
Roots typically become visible growing through the sphagnum moss within four to eight weeks under warm conditions above twenty-two degrees Celsius, at which point the rooted section is cut cleanly just below the moss ball, the plastic wrapping carefully removed, and the new plant established in a small container of well-draining potting mix — beginning its independent life as a new rubber plant that you have successfully propagated entirely through your own skilled and attentive care practice.
Rubber Plant Care Seasonal Changes and Year-Round Maintenance:
One of the most important and frequently underappreciated dimensions of comprehensive rubber plant care is understanding how the plant’s needs shift meaningfully across the four seasons — or, for indoor growers in centrally heated homes, across the two functionally distinct periods of active summer growth and slower winter semi-dormancy — and adjusting your entire care routine accordingly rather than applying the same fixed schedule of watering, feeding, and environmental maintenance throughout the entire year regardless of seasonal context.
During spring and summer, when day length increases, ambient temperatures warm, and natural light intensity strengthens, the rubber plant enters its most energetically active phase of the year, producing new leaves from the growing tips, extending established stems, developing its root system outward and downward through the potting medium, and showing the most visible, rewarding signs of health and vigour that make this species such a satisfying indoor plant to grow and observe closely.
This active growth period demands your most attentive and nutritionally supportive care regime — watering every seven to ten days as moisture levels dictate, applying balanced liquid fertilizer once monthly at the recommended label dilution, cleaning leaves monthly with a soft damp cloth to remove accumulated dust that reduces photosynthetic efficiency, checking monthly for the early signs of pest colonization by spider mites, scale insects, and mealybugs that are most active during warm months, and positioning the plant where it receives the maximum available bright indirect light to fuel the photosynthetic demand of its rapid growth rate during this productive season of peak metabolic activity in careful Rubber Plant Watering Tip management.
As autumn progresses and temperatures begin to drop, day length shortens, and natural light intensity diminishes in northern hemisphere homes, the rubber plant gradually reduces its metabolic rate and transitions toward a period of semi-dormancy characterized by slowed or completely paused new growth, reduced water uptake, and decreased nutrient processing capacity compared to its summer peak.
Failing to recognize and respond to this seasonal transition is one of the most common mistakes in home Rubber Plant Watering Tips — growers who continue watering and fertilizing at summer rates through autumn and winter consistently encounter the twin consequences of overwatering-induced root rot and fertilizer salt build-up in the potting medium, both of which cause significant root damage that manifests as brown leaf tips, progressive yellow leaf drop, and in severe cases complete plant collapse during what should be the quietest and most stable season of the plant’s year.
Correct winter care requires extending watering intervals to every fourteen to twenty-one days depending on home temperature and humidity levels, completely suspending all fertilizer applications from October through February, maintaining minimum temperatures above fifteen degrees Celsius and ideally above eighteen degrees at all times, keeping the plant well away from cold draughts from windows or external doors, and resisting the temptation to compensate for the plant’s slower appearance by changing its light position or watering schedule in ways that further destabilize its already reduced metabolic balance during this critical rest period of seasonal Rubber Plant Watering Tips.
Rubber Plant Care Repotting Guide for Healthy Root Growth:
Knowing when and how to repot is an essential practical skill within comprehensive rubber plant care, because a root-bound plant confined to an undersized container experiences progressively worsening nutrient depletion, reduced water availability, increased susceptibility to root rot caused by the disproportionately rapid cycling of soil moisture through a dense root mass, and ultimately a plateau in growth that no amount of fertilizing or watering adjustment can overcome without providing the plant with a physically larger space for root expansion and new soil medium.
The key indicator that repotting is needed is the appearance of white roots visibly emerging from the drainage holes at the base of the container or circling in dense, compacted masses across the soil surface — both of which confirm the available root volume has been completely occupied and the plant is actively seeking additional growing space beyond the current container boundaries. Repotting should always be performed in early to mid-spring at the beginning of the active growing season, when the plant’s accelerating metabolic rate provides maximum biological capacity to establish quickly in the new, larger container and develop fresh root growth into the surrounding new potting medium with minimal transplant shock or post-repotting stress to the plant’s existing systems.
Select a new container that is only one to two pot sizes larger — typically five to eight centimetres greater in diameter — than the current pot, because excessively large containers hold disproportionately large volumes of soil relative to the root mass they initially contain, creating persistently wet conditions around the outer soil zone that harbour root rot microorganisms and fungal pathogens that exploit the damp, oxygen-poor environment at the container periphery where roots have not yet penetrated and water therefore accumulates without being absorbed.
Prepare the new container by adding a drainage layer of coarse horticultural perlite or clay aggregate pebbles at the base before adding potting mix, ensuring water can flow freely through the entire depth of the container rather than pooling in the lowest soil layers around the base of the root ball where anaerobic conditions and root rot risk are highest.
Use a high-quality peat-free houseplant compost blended with twenty-five to thirty percent perlite by volume to create a substrate that combines the organic matter, moisture retention, and slow-release nutrient content of quality compost with the rapid drainage and aeration characteristics of perlite — a combination that exactly mirrors the well-draining, organically rich forest floor soils in which Ficus elastica has evolved over millennia.
After repotting, water the plant moderately to settle the new medium around the root ball, then withhold further watering for four to five days to allow any roots trimmed or damaged during the repotting process to callus and seal before reintroducing regular moisture — a brief post-repotting dry period that significantly reduces the risk of fungal and bacterial infection entering the fresh root wounds and causing the kind of post-repotting root rot that occasionally follows an otherwise successful and well-executed seasonal report in conscientious rubber plant care practice.
Conclusion
Truly mastering rubber plant care transforms this already beautiful houseplant into an extraordinary, long-lived, and endlessly rewarding centerpiece of your indoor garden. By combining disciplined watering, precise seasonal nutrition, vigilant fungal and bacterial disease monitoring, proactive pest management, skilled propagation, and timely repotting into a cohesive year-round care system, you give your Rubber Plant Watering Tips routine the depth and intentionality it deserves. Every yellow leaf is a message, every new unfurling red-sheathed growth tip is a reward — pay attention to both, respond thoughtfully to each signal your plant sends, and you will enjoy decades of healthy, magnificent, deeply satisfying Rubber Plant Watering Tips success in your home.
FAQ’s
Q1. How often should I water my rubber plant care specimen each week?
For healthy rubber plant care, water every seven to ten days only after the top three centimetres dry.
Q2. Why are the leaves on my rubber plant care plant turning yellow suddenly?
Yellow leaves in rubber plant care usually indicate overwatering, low light, or active nutritional deficiency.
Q3. What causes root rot in a rubber plant care container environment?
Root rot in rubber plant care is caused by chronically wet soil and poor container drainage conditions.
Q4. How much light does a rubber plant care specimen actually need indoors?
Good rubber plant care requires four to six hours of bright, indirect daily sunlight without direct harsh rays.
Q5. How do I treat fungal leaf spots in my rubber plant care routine?
Treat fungal spots in rubber plant care with copper fungicide spray applied every seven days consistently.
Q6. What is the best potting mix for successful rubber plant care at home?
Use peat-free compost blended with thirty percent perlite for excellent rubber plant care drainage performance.
Q7. When should I report during my rubber plant care annual schedule?
Report your rubber plant care specimen in early spring every two years when roots appear root-bound.
Q8. How do I propagate a new plant as part of my rubber plant care practice?
For rubber plant care propagation, take fifteen-centimetre stem tip cuttings and root them in moist perlite.
Q9. Does rubber plant care change significantly during the winter months at home?
Yes, winter rubber plant care requires reduced watering, no fertilizing, and maintaining warmth above fifteen degrees.
Summary
Comprehensive rubber plant care encompasses far more than simply placing a beautiful plant in a corner and watering it occasionally — it requires a deep, practical understanding of the plant’s tropical biological origins, its precise environmental requirements across all four seasons, and its vulnerability to the fungal infections, bacterial diseases, viral pathogens, root rot microorganisms, nutritional deficiencies, and pest infestations that can undermine even the most apparently healthy specimen without warning.
The nine expert strategies covered throughout this guide — spanning light and temperature management, disease prevention and treatment, watering discipline, seasonal care adjustments, propagation, and repotting — give you a complete and proven framework for achieving outstanding rubber plant care results in any home environment. Apply every principle consistently, observe your plant closely and respond to its signals with informed, timely action, and your Rubber Plant Watering Tips journey will reward you with decades of spectacular, healthy, magnificently lush growth that makes this iconic tropical houseplant everything it is capable of becoming under truly expert, dedicated, and loving Rubber Plant Watering Tips.