
Honestly, I almost didn’t buy my first Air Plants. It was sitting in a little wire holder at a farmers market, no pot, no dirt, just there. Looking like something from another planet. The lady running the booth saw me staring and said, “You just spray it with water a couple times a week.” I laughed. That couldn’t be it. But I bought it anyway for five dollars and figured I had nothing to lose.
Fast forward three years and I’ve got twenty-something of these Air Plants all over my house. On the bathroom shelf. Above the kitchen sink. Hanging in my home office in those little glass globe things my sister keeps calling “very Pinterest.” None of them are sitting in soil. Not a single one. And the wild part? They’re honestly the only plants I’ve never killed through sheer neglect, and I have killed a lot of plants.
If you’ve been curious about air plants, stick with me because I’ve learned what actually works through years of mistakes.
Air Plants Basics Every New Owner Needs to Understand First:
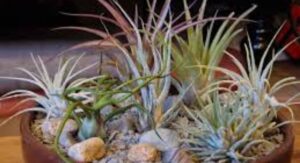
Here’s the thing about air plants that trips most people up at first: they don’t work like regular houseplants at all. These plants — Tillandsia, technically — grow naturally attached to tree branches, cliff faces, even telephone wires in tropical regions. Not in dirt. They cling on and pull moisture straight from the surrounding air and rain through tiny specialized structures on their leaves called trichomes.
The roots on an air plant are basically anchors. They grip onto whatever surface the plant is mounted on, but they’re not actually absorbing water the way a fern or a pothos would through its root system. Once you properly understand that, everything about looking after them starts to make a lot more sense. You water the leaves, not the base. You’re hydrating the whole plant from the outside in, every single time.
Air plants are native to forests, mountains, and dry desert regions across Central and South America, and a handful of species grow as far north as the southeastern United States. Spanish moss trailing off old oak trees in Louisiana? That’s Tillandsia usneoides — technically part of the same family, just looking quite different from the spiky little specimens at your local plant shop. The group is far more varied than most newcomers realize when they first encounter them.
Air Plants and Light The Single Factor That Changes Everything:
I put my first air plant on a shelf directly across the room from any window. It survived, but barely — pale, yellowish, and limp-looking, like it was quietly giving up. I moved it to a proper windowsill and within two weeks it looked like a completely different plant. Greener, firmer, more upright. That was the moment I understood light is genuinely the make-or-break factor for keeping air plants healthy.
Bright indirect light is the right target for most varieties. A spot near a window works well. Harsh direct afternoon sun beating straight through the glass is too intense — it dries them out much faster than you’d expect and tends to bleach the leaf color over time. Morning light from an east-facing window is about as close to ideal as you’ll get indoors. South-facing windows also work fine as long as there’s a thin curtain or the plant is positioned a bit back from the glass.
If your home doesn’t get much natural light, a full-spectrum grow light on a 12-hour timer is a completely practical solution. I run one in my home office and those air plants are among the healthiest in my whole collection. Position the light roughly six to twelve inches away from the plants — too close causes heat stress, too far and they start reaching awkwardly toward it. A simple plug-in timer takes care of the schedule so you never have to think about it.
Air Plants Watering Methods Three Approaches That Genuinely Work:
1. Soaking Method:
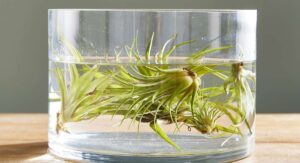
Fill a bowl or your kitchen sink with room temperature water and submerge your air plants fully for 20 to 40 minutes. They soak up moisture through their leaves and come out noticeably plumper and more vivid-looking than they went in. I do this every week for most of my collection, bumping it up to every five days in summer when the house gets dry and warm.
2. Misting Between Soaks:
Between your weekly soaks, a light mist every couple of days helps maintain moisture, especially during dry winters when indoor heating tanks the humidity. Use a regular spray bottle, mist the leaves until they look damp but not dripping, done in about thirty seconds. It’s not a replacement for a proper soak but it keeps things topped up nicely between sessions.
3. Drying After Watering:
After every soaking session, give your air plants a gentle shake to knock off the excess water sitting in the leaves, then set them upside down on a clean towel for a couple of hours before putting them back in their display spots. Upside down lets water drain out of the base rather than pooling in it. This one habit, which takes about ten seconds, has saved more of my plants from rot than anything else in my whole routine. It’s genuinely not optional.
Air Plants Display Ideas That Make Any Room Look More Alive:
This is where things get really fun. Because these plants need no soil and no traditional container, you can put them in places and situations that would be completely impossible with any other houseplant. The display options are almost unlimited once you start looking.
| Display Style | Best Variety | Difficulty | Rough Cost | Visual Impact |
| Hanging glass globes | Tillandsia ionantha | Very easy | Under $10 | Striking and modern |
| Driftwood mounts | Tillandsia xerographica | Easy | Free if found | Natural and dramatic |
| Living picture frames | Tillandsia streptophylla | Moderate | $15 to $30 | Real showstopper |
| Seashell clusters | Tillandsia usneoides | Very easy | Almost nothing | Casual, coastal feel |
| Clay saucer bowls | Tillandsia caput-medusae | Very easy | Under $5 | Earthy and warm |
| Hanging wire spirals | Tillandsia bulbosa | Very easy | Under $10 | Playful and graphic |
| River stone arrangements | Tillandsia capitata | Very easy | Free or very cheap | Clean and minimal |
| Copper pipe wall mount | Tillandsia brachycaulos | Moderate | $20 to $40 | Industrial-chic edge |
| Macramé wall holder | Tillandsia tectorum | Very easy | $10 to $20 | Warm bohemian texture |
| Full living wall panel | Mixed varieties | Advanced | $50 and up | Absolutely spectacular |
One thing worth knowing regardless of what you choose: make sure air can actually circulate around the plant in whatever you put it in. Closed glass terrariums look beautiful but they trap humidity and slowly kill air plants. If you love the glass globe look, use an open-ended one — the kind with a hole at the top or bottom. That small detail genuinely matters for the long-term health of the plant.
Fertilizing Air Plants What You Need and What You Can Skip:
1. Best Fertilizer Type:
Air plants survive without any fertilizer at all. But if you want faster growth, more frequent blooms, and strong healthy pups, feeding them occasionally makes a real difference. Use a bromeliad-specific fertilizer or an orchid formula, mixed to about a quarter of the strength the package suggests. Standard houseplant fertilizer at full strength is almost always too harsh and causes leaf tip burn. I used regular fertilizer at full dose early on and ended up with brown crispy tips across most of my collection — not a fun discovery.
2. How Often to Feed:
Once a month through spring and summer is enough for the majority of air plants. The easiest approach is adding the diluted mix to your soaking water rather than applying it as a separate step — it distributes evenly across all the leaves and you don’t have to build a separate habit around it. Through fall and into winter, I skip fertilizing entirely. Growth naturally slows down in cooler months and the extra nutrients aren’t needed.
3. How to Spot a Nutrient Problem:
Air plants that look persistently pale, grow slowly even in good light, and produce noticeably smaller new leaves are often just hungry. When I see that pattern, I fertilize twice monthly for a couple of months and watch whether things perk up. Yellow tips that appeared after you increased fertilizing, on the other hand, usually mean you’ve overdone it rather than underdone it. Back off the feeding, skip a couple of weeks, and let the plant settle before starting again at a lower dose.
Air Plants Propagation Turning One Plant Into Many Over Time:
One of the best long-term rewards of this hobby is that they multiply on their own, slowly and reliably, without much input from you.
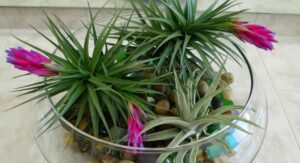
- Every Tillandsia blooms exactly once in its lifetime — often producing vivid purple, pink, or red flowers — and after that bloom finishes, the mother plant shifts her energy entirely into producing side shoots at her base called pups, which are essentially clones of herself that will grow into fully independent air plants given enough time and consistent care.
- Pups are ready to be separated once they reach roughly a third the size of the mother plant — at that stage you just grip the pup near its base, apply steady gentle pressure with a slight twist, and it usually detaches cleanly without needing any tools, though a clean sharp knife is fine to use if the connection happens to be particularly tight.
- Tillandsia usneoides is by far the easiest to propagate because you simply divide a clump into smaller sections, hang each piece somewhere with decent light and airflow, and within a matter of weeks every section starts growing independently with no special treatment whatsoever.
- Keeping the mother plant well-watered and in good light after she starts producing pups genuinely affects how many she produces and how vigorous they are — she’s finishing her own life cycle while investing energy into the next generation, so this last stretch of care matters more than it might seem.
- Pups separated before they reach a third the mother’s size are noticeably more fragile than properly sized ones — they take longer to establish, dry out more easily, and generally look rough for a long time after separation, so waiting just a bit longer before pulling them off pays off significantly in how quickly they settle into independent growth.
Common Problems With Air Plants and How to Fix Them Fast
These plants are forgiving overall, but a handful of problems do crop up regularly — especially while you’re still getting a feel for how your specific home environment affects them.
- Soft, dark, mushy area at the base: This is rot, almost always caused by water sitting in the center of the plant too long after watering. Remove the damaged outer leaves immediately, set the plant somewhere warm with good airflow, let it dry out completely over several days, and hold off on soaking for at least a week. Caught early enough, many air plants come back from rot fully — I’ve rescued several that looked genuinely beyond saving.
- Brown curling tips on the leaf ends: The plant is thirsty, or the surrounding air is too dry. This is the single most common complaint from people who grow these plants indoors, because household humidity is often far lower than what they evolved with. Increase soaking frequency for two or three weeks, add some misting in between sessions, and check whether the plant is sitting near a heating vent or air conditioning unit that might be pulling moisture away faster than usual.
- Pale, washed-out, yellowish overall color: Almost always a light issue. Move the plant to a brighter spot or bring in a grow light. Well-lit air plants have rich, saturated, noticeably vivid color compared to under-lit ones — the difference is immediately obvious once you’ve seen both side by side. Two weeks in better light usually produces a visible change.
- White fuzzy spots or waxy brown bumps on leaves: Mealybugs or scale insects. Mix rubbing alcohol and water at a 50/50 ratio, apply it to the affected areas with a cotton swab, leave it for a few minutes, then rinse the whole plant under running water and let it dry upside down thoroughly. Repeat every three or four days until they’re completely cleared up and keep an eye on nearby plants.
- Won’t bloom despite being mature and healthy: Try the ethylene gas trick — seal the plant in a plastic bag with a ripe apple or banana for two nights in a row. The gas the ripening fruit gives off naturally triggers the blooming response. It sounds like gardening folklore but it’s genuinely reliable and widely used by serious growers when a mature plant is stalling on blooming.
Conclusion
These plants aren’t going to suit absolutely everyone. But for anyone who wants something genuinely low-effort that still brings real life and character into a room, air plants are hard to argue with. Consistent light, regular soaking, thorough drying after watering, and an occasional dose of diluted fertilizer — that really is the full picture. Nail those basics and your air plants will grow steadily, bloom when the time is right, and produce more pups than you probably expected. Start small, watch what happens, and adjust from there. Most people are surprised by how quickly they go from owning two or three to needing a whole new shelf.
FAQ’s
Q1: How often should I be watering my air plants?
A full 20-to-30-minute soak once a week suits most of them well. In summer heat or in homes with low humidity, soaking every five days keeps them noticeably healthier and more actively growing through the warmer months.
Q2: Can air plants survive without any natural light?
They’ll really struggle long-term without decent light of some kind. A full-spectrum grow light on a 12-hour daily timer works well as a substitute — plenty of growers maintain thriving collections entirely under artificial light in offices and windowless spaces.
Q3: My air plants have brown tips — what does that mean?
Brown tips almost always point to underwatering or low surrounding humidity. Try soaking your air plants more frequently for a few weeks and add misting in between. That combination usually clears up tip browning reliably within three to four weeks.
Q4: Do air plants need any soil at all to grow?
Not at any point. These plants are true epiphytes — they evolved to live entirely without soil, absorbing what they need directly through their leaves. That characteristic is exactly what makes them so fun and flexible to display.
Q5: How long do air plants typically live?
Most varieties live several years with good care. After blooming they decline gradually, but they produce pups before the end comes, so the next generation is already growing and the cycle continues on its own without any intervention needed from you.
Q6: Can I keep air plants outside on a porch or balcony?
Yes, and they often thrive outdoors. In warm climates around USDA zones 9 to 11, they can stay outside all year. In colder regions, they do really well outdoors through the warm months in a shaded or dappled-light spot, then come back inside well before the first frost arrives.
Q7: What temperature range works for air plants?
Roughly 50°F to 90°F covers most varieties comfortably. They handle heat fairly well but genuinely dislike frost and cold drafts. Keep them clear of air conditioning vents and heating registers, both of which pull moisture from the leaves much faster than normal room conditions.
Q8: My air plant has been healthy for two years but won’t bloom. What should I try?
Make sure it’s getting strong light, regular watering, and occasional fertilizing first. If everything checks out and it still isn’t blooming, the sealed bag with a ripe apple for two nights usually does it — the ethylene the fruit produces as it ripens triggers the bloom response in mature air plants reliably.
Summary
Air plants are genuinely one of the most rewarding things you can grow indoors, especially if you’ve struggled with plants before. The care requirements are simple, the display options are creative and wide-open, and watching your collection grow, bloom, and multiply over time is more satisfying than you’d expect going in. Get the fundamentals right — good light, consistent watering, thorough drying, occasional feeding — and these plants will take care of the rest. Whether you keep a few of them on a shelf or eventually fill an entire wall, they fit into almost any space and almost any lifestyle without much fuss.