The first time I tried to figure out how to plant potatoes, I bought a bag from the grocery store, cut them up, dropped them in the ground, and waited. Nothing came up for six weeks. Then a few sad, yellow stems appeared and eventually collapsed. My father-in-law walked over, looked at the bed, and without any drama said: “Those were treated to stop them sprouting. You can’t plant grocery potatoes.” Nobody had told me that. Not one article I read had mentioned it either — at least not prominently enough for me to catch it.
That first failure sent me down a rabbit hole that took two full growing seasons to climb out of. I read books, pestered experienced growers at the farmers market, and ran my own experiments in a raised bed behind our garage. What came out of all that is a genuinely practical understanding of how to plant potatoes — not theoretical, not copied from a seed packet, but actually tested in real soil with real results. This guide is everything I wished I had read before I started.
Follow this honest, experience-backed guide on how to plant potatoes and grow healthier, bigger harvests successfully throughout this season easily.
How to Plant Potatoes Choosing the Right Seed Potato Variety:

Before you touch a spade or think about soil, the variety decision shapes everything that follows. Learning how to plant potatoes properly starts at the point of purchase — not in the ground. Early varieties like Rocket or Swift mature fast, which is perfect if your growing season is short or you want new potatoes in early summer. Maincrop varieties like Desiree or King Edward take longer but give you that satisfying bulk harvest in autumn.
Certified seed potatoes are non-negotiable. This is the exact mistake I made my first year. Anyone figuring out how to plant potatoes for the first time needs to understand that grocery store potatoes are treated with sprout inhibitors — chemicals that prevent exactly what you need them to do. Certified seed potatoes from a garden center are clean, disease-tested, and ready to grow. Spend the extra few dollars. It is genuinely not worth skipping.
How to Plant Potatoes by Variety a Complete Comparison Guide:
One question that comes up constantly when people learn how to plant potatoes is which variety to actually choose. Type, days to harvest, and intended use all vary wildly. The table below cuts through the noise and gives you the ten most reliable options side by side.
| Variety | Type | Days to Harvest | Best Use |
| Rocket | First Early | 60–70 days | New potatoes, salads |
| Swift | First Early | 60–65 days | Boiling, new potatoes |
| Charlotte | Second Early | 75–90 days | Salads, roasting |
| Maris Piper | Maincrop | 100–120 days | Chips, mash, roasting |
| King Edward | Maincrop | 110–125 days | Roasting, baking |
| Desiree | Maincrop | 105–120 days | All-purpose, stores well |
| Yukon Gold | Mid-season | 80–95 days | Mash, butter potatoes |
| Red Pontiac | Maincrop | 100–110 days | Boiling, soups |
| Nicola | Second Early | 80–90 days | Salads, waxy cooking |
| Sarpo Mira | Maincrop | 110–130 days | Blight-resistant, storing |
How to Plant Potatoes after Chitting Them Correctly at Home:

Chitting is the step that separates gardeners who wonder why their potatoes are slow from those who get an early and vigorous crop every year. When you understand how to plant potatoes with properly chitted seed, you are basically giving them a three-week head start before they even touch the soil. Here is exactly how to do it right.
1. Start Chitting Early:
One week shy of six before you mean to put spuds in soil, set them in egg cartons, fat end up where the bumps cluster. A chilly, sunlit spot without ice does well – maybe a quiet window in a guest room. Short green nubs beat long white strings when starting off. Sprouts under one inch? That is what works best. Not longer.
2. Light Makes Difference:
The most common chitting mistake is doing it in the dark. Dark storage produces long, fragile white shoots that snap off the moment you handle the tuber. How to plant potatoes successfully begins with understanding that chits grown in good light come out short, green, and robust — they survive planting and hit the ground running without any lag time at the start of the season.
3. Temperature Matters Hugely:
Aim for around 50°F (10°C) during chitting. Anything warmer and the sprouts grow too fast and become leggy. Too cold and nothing happens at all. Knowing how to plant potatoes with well-prepared tubers means you avoid the frustrating wait that comes when your chitting conditions were off and the eyes barely moved before planting day arrived and forced you to plant anyway.
How to Plant Potatoes in Soil That Is Properly Prepared First:
Soil preparation is the part most beginners rush through because they are excited to get the seed in the ground. I rushed it too, for my first two seasons. Once I slowed down and actually prepared properly, my yields roughly doubled. Here is what how to plant potatoes with genuinely good soil preparation actually looks like in practice.
1. Loosen Deeply First:
Dig or fork your bed to a depth of at least twelve inches before planting. Potatoes are underground crops and they need loose, uncompacted soil to swell and expand without obstruction. Tight clay soil produces small, misshapen tubers no matter what else you do right. Anyone serious about how to plant potatoes well treats the loosening step as the single most important physical preparation task of the whole process.
2. Feed the Soil:
Mix plenty of broken-down compost or old animal manure into the soil ahead of placing the seed pieces. Because potatoes pull hard on available nutrients, fullness in the growing layer makes a clear difference. Drainage gets easier in dense ground, while loose sand holds water better when compost goes in. A thin, starved patch means weak results even if every step seems correct afterward.
3. Check Your pH:
Potatoes prefer slightly acidic soil — between 5.5 and 6.5 on the pH scale. Above that range, scab becomes a real problem, causing rough, corky patches on the skin. Below it, nutrient uptake suffers. A simple test kit costing next to nothing tells you exactly where you stand. Part of knowing how to plant potatoes well is understanding that pH shapes disease resistance as much as any other factor.
How to Plant Potatoes at the Correct Depth and Spacing:
Depth and spacing are where the actual mechanics of how to plant potatoes get specific. These are measurable things with real right and wrong answers. Vague advice like “plant them a bit deep” has ruined plenty of beginners’ crops. Here are the three specific things that ma awtter most when putting seed potatoes in the ground.
1. Four Inches Deep:
Plant seed potatoes about four inches deep at the bottom of a trench or individual hole. Shallower than that and the developing tubers push up through the soil surface and turn green and bitter from light exposure. Deeper and emergence slows significantly. The four-inch rule is the consistent answer across virtually every reliable source on how to plant potatoes and it is the one measurement worth remembering precisely.
2. Spacing Between Plants:
Early varieties need about twelve inches between plants with rows spaced two feet apart. Maincrop varieties need more room — around fifteen inches between plants and two and a half feet between rows. Crowding potatoes does not increase yield. It decreases it. When learning how to plant potatoes for the first time, over-planting a small space is one of the most tempting and consistently disappointing mistakes a beginner makes.
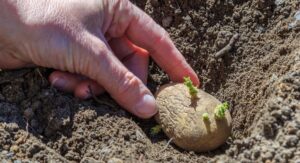
3. Eyes Facing Upward:
Upward must face the sprouting spots on each seed piece. Seems clear – until you’re outside at dawn, fumbling with two dozen chunks, some landing upside down or tipped on their side. Light waits above, so young stems should climb straight, not wander under soil. Getting this small step right – the direction of those knobby growth points – affects how fast green tips appear and how strong they look once up. That little angle shift matters more than it seems.
How to Plant Potatoes and Water Them Without Causing Rot:
Water management trips up more potato growers than almost anything else. The instinct to water heavily right after planting is almost universal — and almost universally wrong. When you are learning how to plant potatoes, understanding what watering the tubers actually need at each growth stage will save you from the soggy, rotted disappointment that kills so many first-time crops.
1. Hold Off Initially:
Right away, keep the ground damp near your seed potatoes – never soggy. Unless the dirt feels completely parched, skip heavy watering at first. Rot can hit fast when new tubers sit too wet during their early stretch. Most folks digging into potato growing tips notice soaked soil leads to more problems than drought does in those opening days.
2. Water at Flowering:
Flowers opening on potato plants? That signals peak growth below ground. When blossoms appear, the lumpy bits beneath the soil push outward fast – they need steady dampness now more than ever. Skip light splashes each morning. Instead, dump water deep into the earth just once or twice a week. You might not notice how much difference it makes until you dig up two patches: one soaked during bloom, one left parched. The contrast hits hard.
3. Avoid Waterlogging Always:
Raised beds or ridged rows are the traditional solution to waterlogging. If your garden holds water after rain, planting in flat ground almost guarantees tuber rot. Ridging up the soil around the stems solves two problems at once: it improves drainage and it covers any tubers pushing toward the surface. The physical act of earthing up is built into every credible guide on how to plant potatoes for exactly this reason.
How to Plant Potatoes and Earth Them Up for Better Yields:
Earthing up is the one ongoing task that how to plant potatoes guides mention but rarely explain clearly enough. Once stems reach about six to eight inches tall, you draw soil up around them, leaving only a few inches of growth visible. You repeat this two or three times as the plants grow. Here is why it matters and exactly how to do it.
- Earthing up protects developing tubers from light exposure, which turns potatoes green and makes them mildly toxic — this is non-negotiable when mastering how to plant potatoes properly and safely.
- Drawing soil up around the stems encourages new tubers to form along the buried stem sections, directly increasing your total yield per plant without any extra work or seed cost.
- The ridges created by earthing up improve drainage around the root zone, preventing the waterlogged conditions that cause late blight and tuber rot to spread rapidly through a crop.
- Earthing up also suppresses weeds by covering the soil surface before weeds establish — one of the more underrated benefits that experienced growers who know how to plant potatoes well rely on every season.
- Do the final earthing up before the plant canopy closes over completely — once the leaves meet between rows, the work is done and you simply wait for the tops to die back before harvesting.
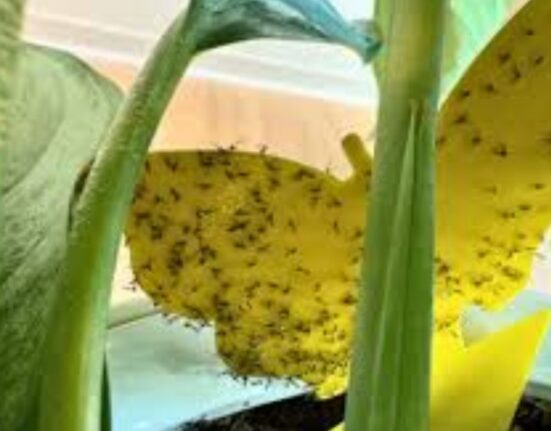
How to Plant Potatoes and Protect Them from Common Pests:
A healthy potato crop attracts some determined pests. Knowing how to plant potatoes is only half the job — keeping what you plant alive through the season requires recognizing problems early and acting on them quickly before they spread.
- Late blight is the most destructive disease for any potato grower — brown patches spreading rapidly across the foliage signal an emergency, and affected material must be removed immediately before it reaches the tubers underground.
- Slugs tunnel directly into tubers underground and ruin harvests that look perfect from the surface — iron phosphate slug pellets or a ring of sharp grit around the planting area offers effective protection without harming wildlife.
- Colorado beetle larvae strip foliage completely in areas where it is present — inspect the undersides of leaves regularly from June onward and remove any orange egg clusters by hand the moment you spot them.
- Wireworms bore small holes into tubers stored in the ground too long — knowing how to plant potatoes in rotation, never in the same bed two years running, naturally reduces wireworm populations over time.
- Potato cyst nematode builds up in soil where potatoes grow repeatedly — a strict four-year rotation between beds is the simplest and most effective long-term defence any serious grower can put in place.
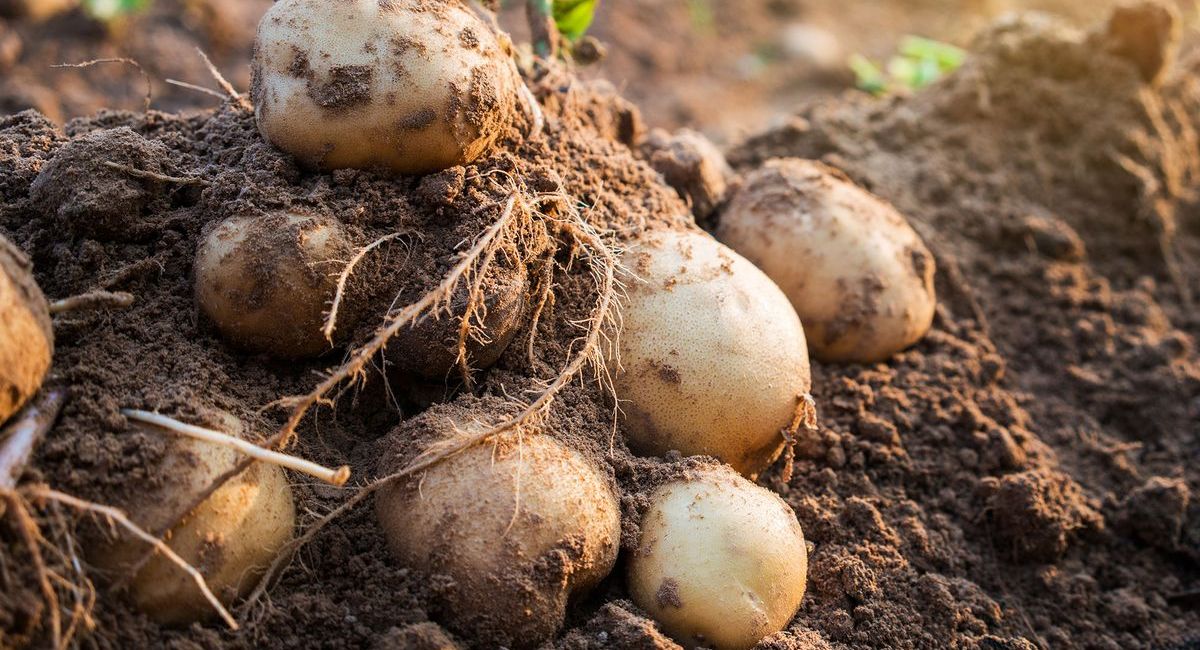
Conclusion:
Genuinely understanding how to plant potatoes is not complicated once someone lays it out honestly. Get certified seed, chit it properly in good light, prepare your soil deeply, plant at the right depth with eyes up, earth up when the stems hit six inches, and water consistently once flowering begins. That is the whole framework. Everything else is refinement. My first real harvest — the season after my grocery store disaster — filled two large colanders. I pulled each one out of the ground like finding something buried on purpose just for me. That feeling never gets old. Start there.
FAQ’s
Q1: When is the best time to learn how to plant potatoes outdoors?
The right time to put into practice what you know about how to plant potatoes outdoors is after the last frost date in your area. For most temperate regions, that means somewhere between late March and mid-May depending on your local climate and elevation.
Q2: Can I apply how to plant potatoes knowledge to containers or bags?
Absolutely. Everything about how to plant potatoes in the ground translates to containers — correct depth, good drainage, and regular earthing up by adding compost as the stems grow. Bags and barrels of at least fifteen gallons work especially well for early varieties.
Q3: Do I need to cut seed potatoes before planting?
Larger seed potatoes can be cut into pieces as long as each piece has at least two eyes. Let cut surfaces dry for a full day before planting to prevent rot. Small seed potatoes below the size of a golf ball are planted whole — this part of how to plant potatoes is often overcomplicated.
Q4: How deep should the trenches be when learning how to plant potatoes?
Trenches for how to plant potatoes correctly should be about four to six inches deep. Place the seed potato at the bottom and cover with soil. The extra two inches above the tuber gives room for the first earthing-up session once stems emerge through the surface.
Q5: How often should I water after understanding how to plant potatoes?
Once you have applied what you know about how to plant potatoes, water sparingly until shoots appear. After that, aim for about one inch of water per week. Increase watering significantly during the flowering stage when tubers are actively swelling underground and moisture most directly affects final yield size.
Q6: How do I know when potatoes are ready after I plant potatoes correctly?
First earlies are ready roughly ten weeks after planting when flowers appear. Maincrops are ready when the foliage yellows and collapses completely. Harvest on a dry day if possible. Knowing how to plant potatoes at the right time makes this calendar predictable rather than guesswork every season.
Q7: What fertilizer works best once I plant potatoes in the ground?
A balanced fertilizer with decent potassium content works well. Apply at planting and once more when the foliage is about eight inches tall. Avoid high-nitrogen feeds as they push leafy growth over tuber development. Anyone putting how to plant potatoes knowledge into action benefits hugely from feeding correctly.
Q8: Why do my potatoes go green even after I plant potatoes at the right depth?
Greening happens when light reaches tubers pushing up through or near the soil surface. Even correctly planted potatoes can turn green if earthing up is skipped or delayed. Regular mounding of soil around the stems throughout the growing season is the simple fix — it is an essential part of the full how to plant potatoes process.
Summary
Getting how to plant potatoes right comes down to a short list of non-negotiables. Always buy certified seed potatoes, never grocery store ones. Chit them in cool, bright conditions for six weeks before planting. Prepare soil deeply with added compost, check pH, and aim for 5.5 to 6.5. Plant eyes upward at four inches deep. Earth up repeatedly as plants grow. Water consistently through flowering. Rotate beds every year. Follow this process faithfully and how to plant potatoes stops being a source of frustration and becomes one of the most satisfying things you do in the garden each year.